JSF 2.3 – The WebSocket Quickstart under Payara Server
Uncategorized
Guest blog by Anghel Leonard ( @anghelleonard ).
Starting with JSF 2.3-m05 we can take advantage of a brand new feature – register a WebSocket push connection in client side. Thanks to the JSF team (especially to Bauke Scholtz (aka BalusC)) this feature is available in today milestone via <f:websocket/> tag.
In this post, let’s see a minimal usage of <f:websocket/> tag.

On the JSF page, we need to add the <f:websocket/> tag with its two required attributes:
channel – This is javax.el.ValueExpression that must be evaluated to String and it represents the name of the WebSocket channel. A channel name is restricted to alphanumeric characters, hyphens, underscores and periods. A channel can have multiple open WebSockets, and each of these sockets will receive the same push notification from the server.onmessage – This is javax.el.ValueExpression that must be evaluated to String and it represents the a JavaScript listener function that is automatically invoked when a push notification is received from the server.The signature of the listener function for onmessage is of type:
function fooListener(message, channel, event) {
 // message - the message pushed by the server
 // channel - the channel name
 // event - the raw MessageEvent instance
}
So, a simple <f:websocket/> tag usage will look like this:
<f:websocket channel="clock" onmessage="socketListener" />

<div id="clockId"></div>

<script type="text/javascript">
 function socketListener(message, channel, event) {
  document.getElementById("clockId").innerHTML += message + "<br/>";
 }
</script>
By default, when we start the application, the WebSocket is automatically connected and open. As long as the document is open the WebSocket is open. When the document is unloaded the WebSocket is automatically closed. In the WebSocket is initially successfully connected but the connection is closed as a result of e.g. a network error or server restart, JSF will try to auto-reconnect it at increasing intervals.
Now, let’s focus on the server side. Here we have to take into account the push messages mechanism. This mechanism is based on javax.faces.push.PushContextinterface and javax.faces.push.Push API.
First, you need to know that by default the WebSocket is application scoped. This means that the managed bean that can push messages to this web socket must be in application scope (annotated with @ApplicationScope). In this case, the push message can be sent by all users and the application itself.
Furthermore, you have to inject PushContext via @Push annotation on the given channel name in any CDI/container managed artifact. For example:
@Inject
@Push(channel = "clock")
private PushContext push;
Finally, we need to write an action method capable to push messages to WebSocket via PushContext. For example:
public void clockAction(){
Calendar now = Calendar.getInstance();
String time = now.get(Calendar.HOUR_OF_DAY) + ":" +
now.get(Calendar.MINUTE) + ":" +
now.get(Calendar.SECOND);
LOG.log(Level.INFO, "Time: {0}", time);
push.send(time);
}
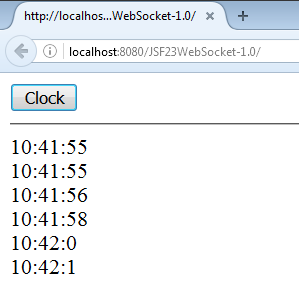
Let's glue everything together. First, the JSF page:
<h:body>
<h:form>
<h:commandButton value="Clock" action="#{pushBean.clockAction()}">
<f:ajax />
</h:commandButton>
</h:form>
<f:websocket channel="clock" onmessage="socketListener" />
<hr/>
<div id="clockId"></div>
<script type="text/javascript">
function socketListener(message, channel, event) {
document.getElementById("clockId").innerHTML += message + "<br/>";
}
</script>
</h:body>
Next, our simple CDI bean:
@Named
@ApplicationScoped
public class PushBean implements Serializable {

 private static final Logger LOG = Logger.getLogger(PushBean.class.getName());

 @Inject
 @Push(channel = "clock")
 private PushContext push;

 public void clockAction(){
  Calendar now = Calendar.getInstance();

  String time = now.get(Calendar.HOUR_OF_DAY) + ":" +
                now.get(Calendar.MINUTE) + ":" + now.get(Calendar.SECOND);
  LOG.log(Level.INFO, "Time: {0}", time);

  push.send(time);
 }
}
In order to avoid an error as in figure below (from Payar Server), we need to add a fake endpoint:

As BalusC pointed out, this fake endpoint should look like below:
import javax.websocket.Endpoint;
import javax.websocket.EndpointConfig;
import javax.websocket.Session;

public class FakeEndpoint extends Endpoint {

 @Override
 public void onOpen(Session session, EndpointConfig config) {
  // https://java.net/jira/browse/WEBSOCKET_SPEC-240
 }
}
Finally, the m05 requires the following settings in web.xml:
<context-param>
 <param-name>javax.faces.ENABLE_CDI_RESOLVER_CHAIN</param-name>
 <param-value>true</param-value>
</context-param>
<context-param>
 <param-name>javax.faces.ENABLE_WEBSOCKET_ENDPOINT</param-name>
 <param-value>true</param-value>
</context-param>
Done! The complete application was tested under Payara Server and it is available here.
Originally published by OmniFaces on the 25th of March: http://www.omnifaces-fans.org/2016/03/jsf-23-websocket-quickstart.html
Share:

 5 minutes
Published a little later than usual due to a busy conference season, this edition looks back at the key […]
4 minutes
As we kick off the new year, this January edition of The Monthly Catch looks back at everything that […]
 7 minutes
Modernizing enterprise applications is a strategic imperative for organizations that want to remain competitive and resilient. According to our […]
Hi,
If I need to access a database in this sample code, ApplicationScoped is a big problem, because using CDI to inject a JTA connection at startup time causes this to be used all the time of the webapp. And it I don’t use CDI to inject, I need to manually connect using a RESOURCE_LOCAL config from persistence.xml, right?
Yes, you’re right 🙂 You can use EJB-JPA and inject the EJB in JSF beans.
Using Payara Micro 5.183 I needed to make two changes to get this code to work on a Raspberry Pi. First, I deleted the FakeEndpoint. This stopped exceptions being thrown. Second, the javascript function socketListener needed to be placed at the start of the and before the tag that referenced the function.
To make that tutorial working change in xhtml:
First implement the script of the socket listener then implement the websocket tag, because the websocket tag referenced to the script; the other way will result in an error!