Using MySQL with Payara Server
Payara
MySQL is an open-source relational database you may wish to use with Payara Server, that excels at fast reads and is commonly used as storage for a CMS. This blog will show you how to set up MySQL on Ubuntu and connect to it from Payara Server.
To install MySQL on Debian or Ubuntu based distributions running the following command in the terminal:
apt-get install mysql-server mysql-client
When it has finished downloading you will be asked to enter a root password. For the purposes of the tutorial I will be using password as a placeholder. Remember to use a strong password in a production environment.

MySQL should start automatically.
You can test whether MySQl has started by running the login command
mysql -uroot -ppassword
If you get:
ERROR 2002 (HY000): Can't connect to local MySQL server through socket '/var/run/mysqld/mysqld.sock' (2)
This means that MySQL isn’t running. You can start it with:
sudo service mysql start
Once you have logged in to the database if you run the command
SHOW DATABASES;

You will see the above default databases. They are required for MySQL to work. For this tutorial I will create an example project and database. To create a new database:
CREATE DATABASE amazon;
To create a user with the username amazonas and the password ‘river’ on the computer:
CREATE USER ‘amazonas’@’localhost’ IDENTIFIED BY ‘river’;
GRANT ALL PRIVILEGES ON amazon.* TO ‘amazonas’@’localhost’;
Download the MySQL JDBC driver from https://dev.mysql.com/downloads/connector/j/, then add the jar to Payara Server by running the asadmin command:
asadmin add-library /path/to/mysql-connector-java-bin.jar
Remember to download the corresponding JDBC driver for the version of the MySQL database server that you installed.
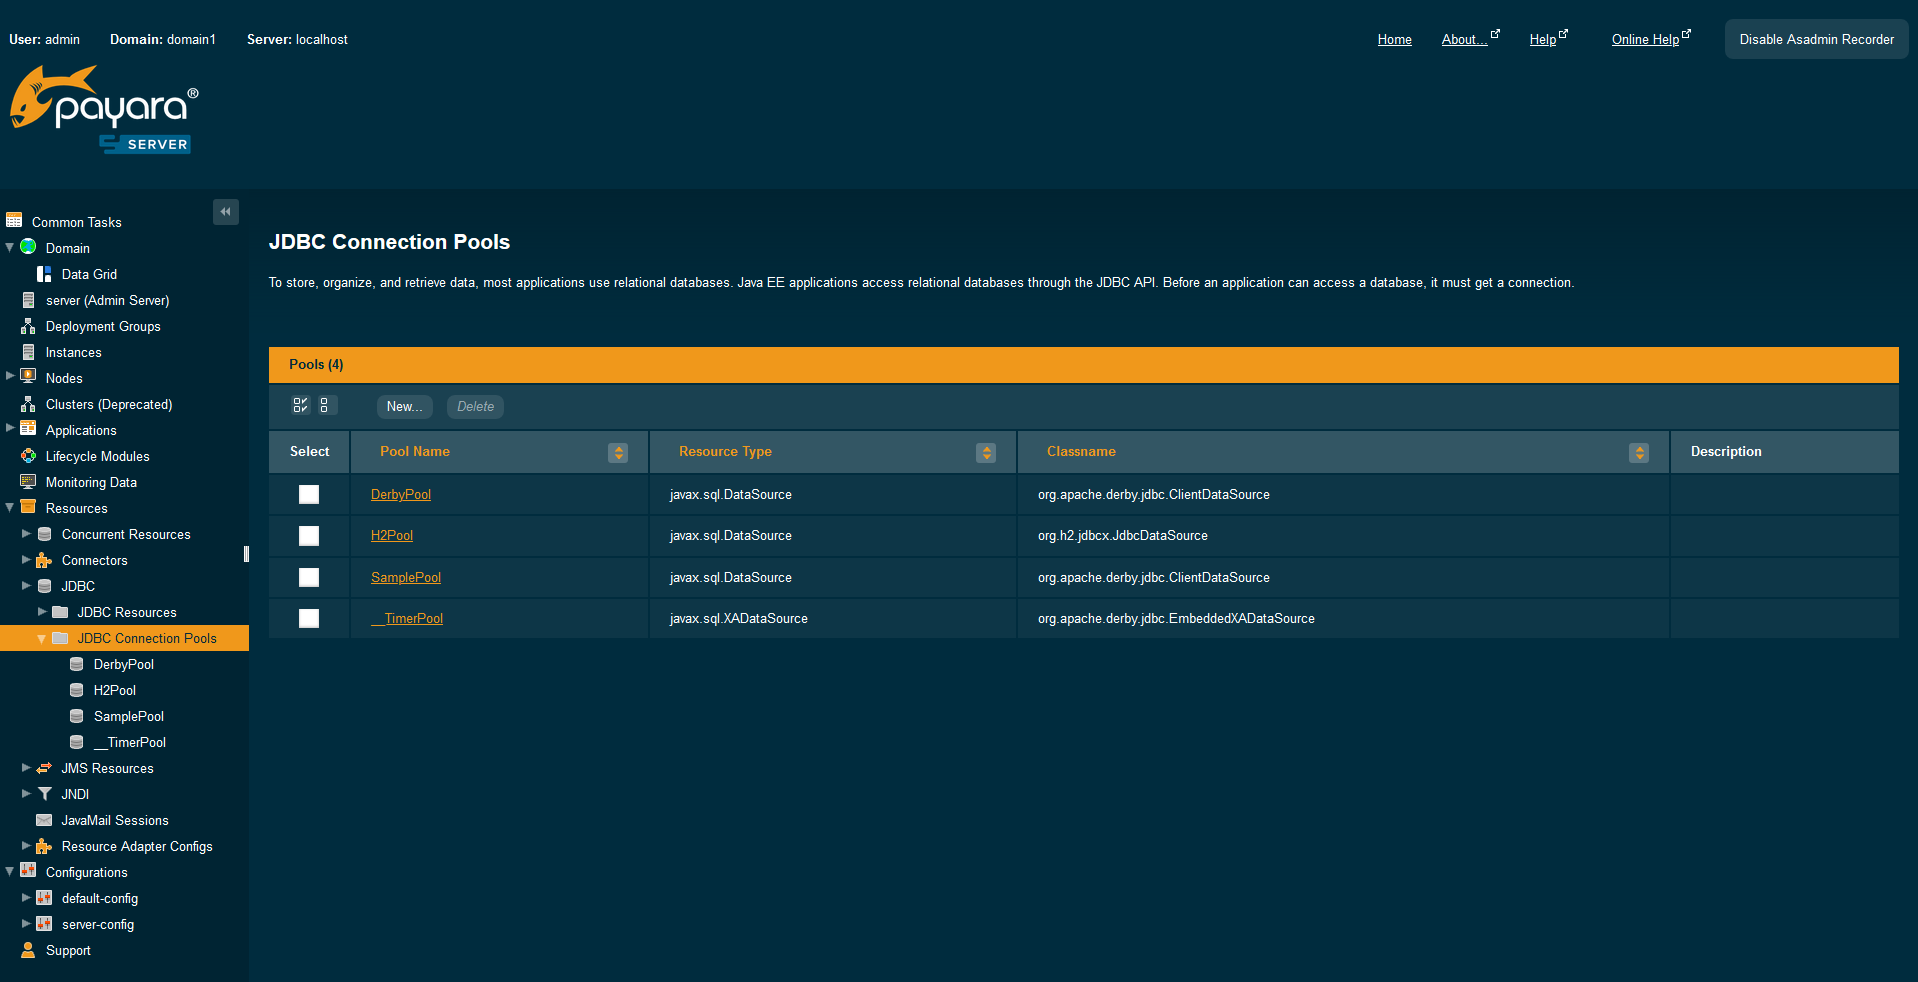
Then go to the administration console at http://localhost:4848. Go to Resources → JDBC → JDBC Connection Pools.
You will notice there are two pools already. These are the default server pools and are not recommended for production usage. Click the New buttton.
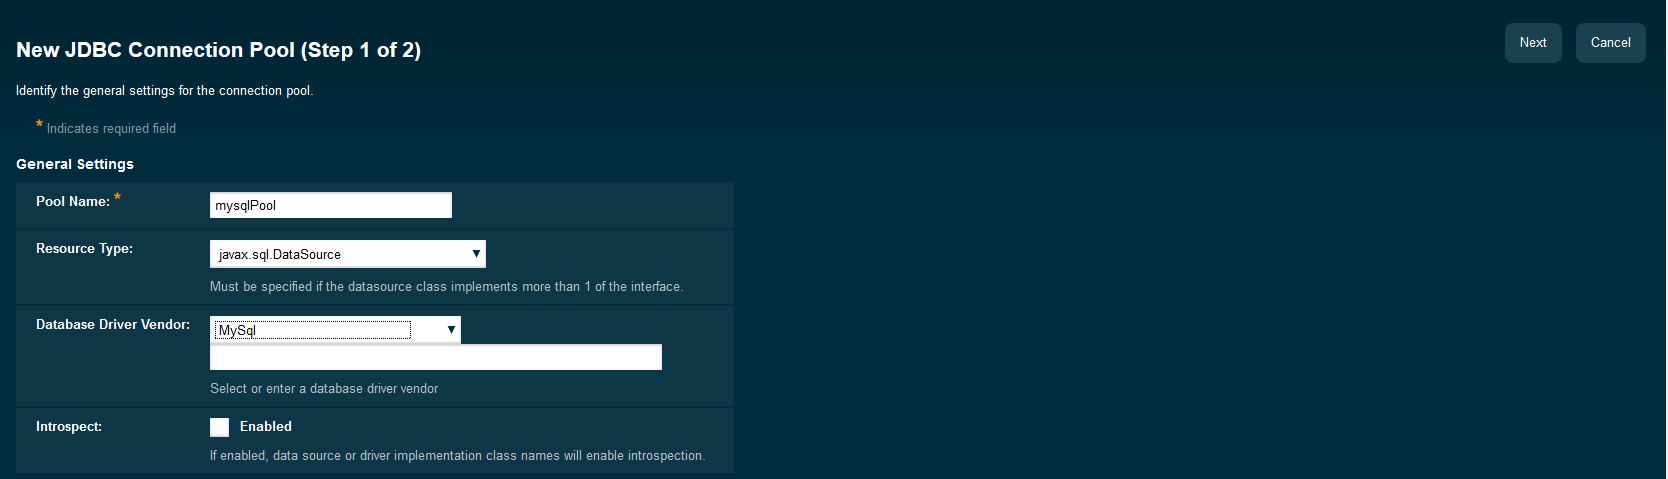
The pool name is how the connection pool is to be referred to when using it as a JNDI resource, which here I will set to mysqlpool. Set the resource type to javax.sql.DataSource and and choose the database driver vendor accordingly: If using a MySQL version equal or higher than 8.0, choose MySql8, otherwise choose MySql. Then click Next.
On the next page scroll down to the bottom where there is additional properties. There you must set the following properties:
ServerName – this is the location of the MySQL server. In this case, if the database is located on the same machine then this will be localhost.PortNumber: The port where the MySQL server is listening to new connections. Usually is 3306User – the username for the database.Password – the password for the specified userDatabaseName – The name of the database you want to connect to.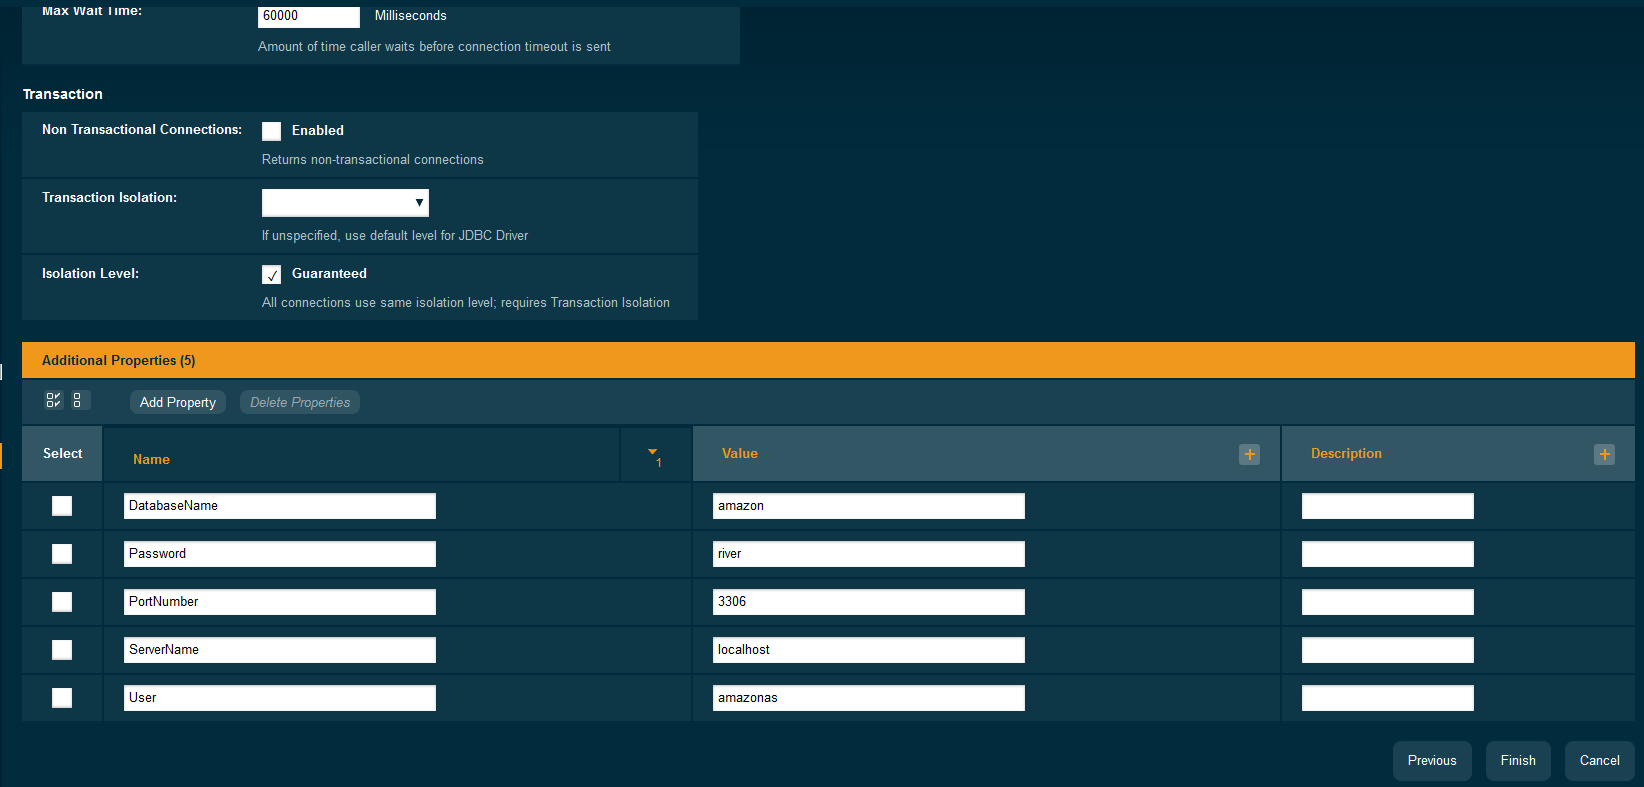
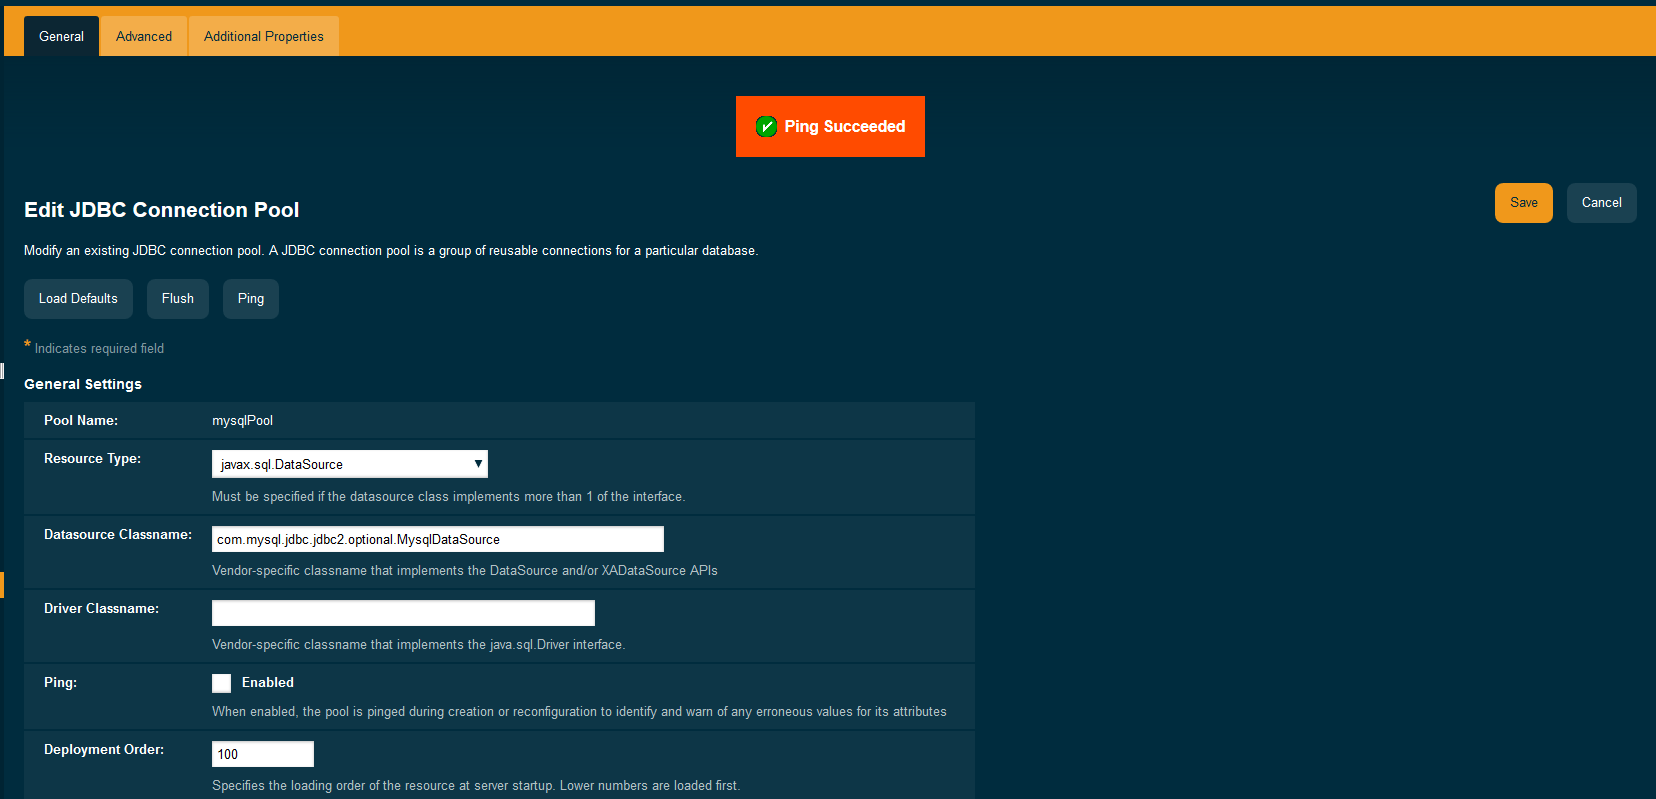
You can test the connection by clicking the ping button once the pool has been created. For more information on connection pools see http://blog.payara.fish/an-introduction-to-connection-pools-in-payara-server
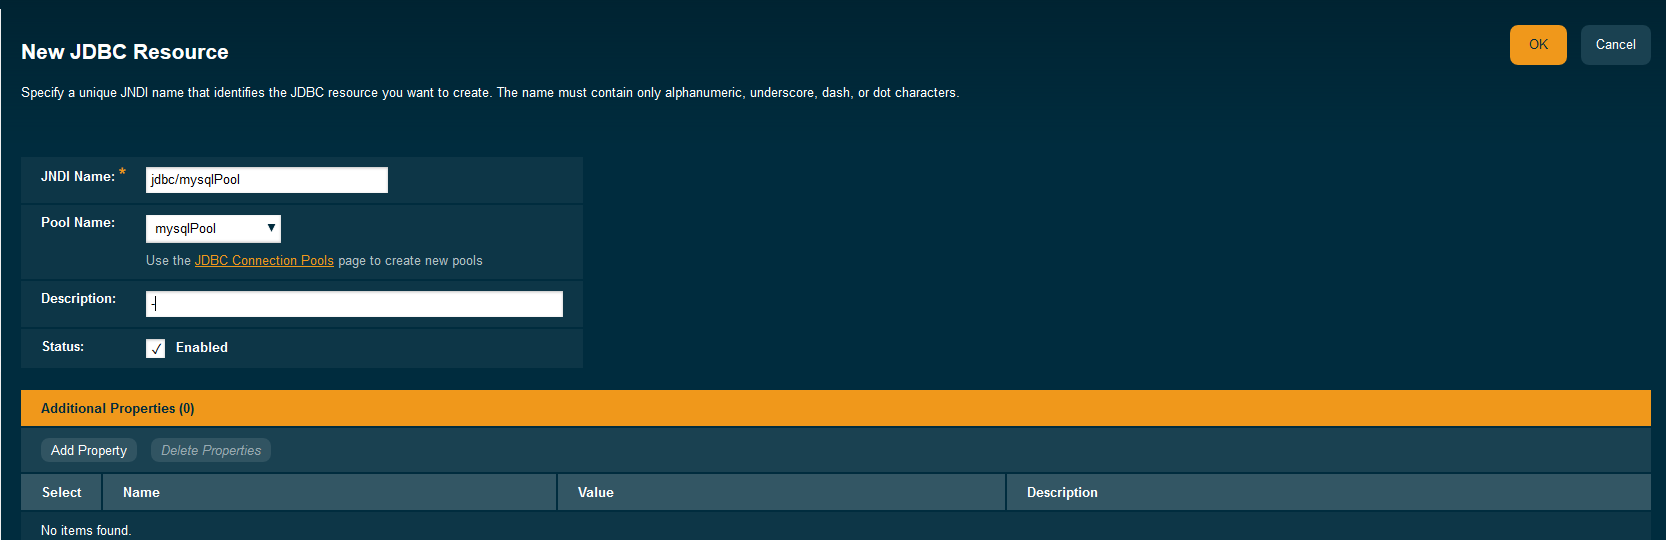
 Then go to Resources → JDBC → JDBC Resources and click on New.
Enter the JNDI name that you wish to use and set the pool name to be mysqlPool, as set up in the previous step.
Now, you can inject a reference to a datasource for the MySQL database inside a managed component like this:
@Resource(lookup = "jdbc/mysqlpool")
DataSource ds;
Note that you can only use resources in a web container or a managed bean (i.e. CDI beans, EJBs etc.).
{{cta(’08c61157-b5fb-4c64-8e5b-e81cfa53379a’)}}
Share:

 1 minute
Earlier this week, we’ve launched the 2026 Payara Platform Community Survey and we’d love to hear from you. If […]
 4 minutes
Strategic acquisition bolsters Azul’s Java platform with complementary products, deep Java expertise and accelerated go-to-market capabilities SUNNYVALE, Calif., and MALVERN, […]
 3 minutes
When legacy systems approach end-of-life (EOL), enterprise IT teams typically face the choice of moving forward at all costs […]
Whenever I follow this guide, when I attempt to ping the database I get an error “Class name is wrong or classpath is not set for : com.mysql.jdbc.jdbc2.optional.MysqlDataSource Please check the server.log for more details.” Everything is exactly how it should be, all database details are correct.
That occurs when the mysql driver not been added to the classpath. Make sure that the driver is present under payara5/domains/{domainname}/lib and try running the add-library command again.
I think I got the same error. Ultimately I think I found that the name of the class had changed when MySQL went to v8. That’s from memory. Certainly, the default JDBC driver class has changed (the one in the META-INF file in the jar), and I think that has screwed up a ton of tutorials and code right across the universe.
Thanks for your information JON Jefferies. You are right in that the datasource classname has changed. You can download the old version of the JDBC driver by clicking on the ‘previous GA releases’ link just above the download box, which will work with versions of MySQL previous to 8.0.
To use the new version of MySQL after creating the connection pool open the domain.xml and edit the datasource-classname of the connection-pool to com.mysql.cj.jdbc.MysqlDataSource, which is the classname in the new version. This will be made the default in a future version of Payara.
I have just followed the steps of this guide with Payara 5.201 and MySQL 8.0.19 but, when I ping, I receive this message:
Ping Connection Pool failed for mySQLPool. Connection could not be allocated because: Communications link failure The last packet sent successfully to the server was 0 milliseconds ago. The driver has not received any packets from the server. Please check the server.log for more details.
Regretfully, I get the same error message. Checking the server log I get this message from the link provided:’http://localhost:4848/management/domain/resources/ping-connection-pool.json’
{“message”:”Cannot find poolName in ping-connection-pool command model, file a bugninjection failed on org.glassfish.connectors.admin.cli.PingConnectionPool.poolName with class java.lang.String”,”command”:”ping-connection-pool command”,”exit_code”:”FAILURE”,”extraProperties”:{“methods”:[{“name”:”GET”},{“messageParameters”:{“appname”:{“acceptableValues”:””,”defaultValue”:””,”optional”:”true”,”type”:”string”},”id”:{“acceptableValues”:””,”defaultValue”:””,”optional”:”false”,”type”:”string”},”modulename”:{“acceptableValues”:””,”defaultValue”:””,”optional”:”true”,”type”:”string”},”targetName”:{“acceptableValues”:””,”defaultValue”:””,”optional”:”true”,”type”:”string”}}}],”commandLog”:[“ping-connection-pool”]},”children”:[{“message”:”Usage: ping-connection-pool [–appname=appname] [–modulename=modulename] pool_name “,”properties”:{}}]}
Does the sentence “{“message”:”Cannot find poolName in ping-connection-pool command model, file a bug” imply that there is a bug(?) I shall copy the steps in the issues in GitHub, see what response I get.
Even I got the above errors but I resolved it performing the below,
a. Add the mysql-connector-java-bin.jar to both of the below locations,
..payara5glassfishlib
..payara5glassfishdomainsdomain1lib
b. Open a command prompt and navigate to the below location.
..payara5glassfishbin using your explore
c. And run the below command to create a connection pool. Make sure you update the user, password and database name accordingly.
asadmin create-jdbc-connection-pool –ping –restype javax.sql.DataSource –datasourceclassname com.mysql.cj.jdbc.MysqlDataSource –property user=root:password=password:DatabaseName=test:ServerName=127.0.0.1:port=3306:useSSL=false:zeroDateTimeBehavior=CONVERT_TO_NULL:useUnicode=true:serverTimezone=UTC:characterEncoding=UTF-8:useInformationSchema=true:nullCatalogMeansCurrent=true:nullNamePatternMatchesAll=false MySqlPool
d. This will create a new connection pool with the name MySqlPool. You can ping the same command prompt to check if you can test the connection,
asadmin ping-connection-pool MySqlPool
e. Now navigate to the admin portal of your payara server and then to the JDBC connections pool. You will see the above created connection pool.
Yep! Working for me, thank you! 🙂
Thanks a lot, mate! Saved my life!
Thanks alot! This saved me alot of time.
Hello.
Do you happen to know how to use MySQL Connector/J’s replication feature in an elegant way, together with EJB, JPA and XADataSource?
https://dev.mysql.com/doc/connector-j/8.0/en/connector-j-master-slave-replication-connection.html
Documentation suggests using connection.setReadOnly() in order to use a slave database, but:
1. If I am not inside JPA transaction (TransactionAttributeType for all methods on the stack is NOT_SUPPORTED or SUPPORTS) then EntityManager does not have connection (EntityManager.unwrap() returns null). I’m using EclipeLink bundled in Payara.
2. Suppose I annotate my read-only method with TransactionAttributeType.REQUIRED. Now, I have access to connection, but because of “XA” SQL commands being sent I cannot flag the connection as read-only.
My current workaround is having two data sources, two related entity managers: one read-write and one read-only, and a method returning one of them depending on the context (I have a separate annotation to flag a “top” method to be truly read-only, something like in Spring).
I got the same error as many:
Ping Connection Pool failed for mySQLPool. Connection could not be allocated because: Communications link failure The last packet sent successfully to the server was 0 milliseconds ago. The driver has not received any packets from the server. Please check the server.log for more details.
I added the property “useSSL=false” and it started to work, I don’t know why.
If the clientCertificateKeyStoreUrl property is not set, the connection will fall back to the system keystore, where the provided certificate that is not signed by a CA would not be trusted by the server, and this may produce the SQLException you are experiencing. Try setting the fallbackToSystemKeyStore property to false in the connection pool settings or with the asadmin command set resources.jdbc-connection-pool.{CONNECTION_POOL_NAME}.property.fallbackToSystemKeyStore=false