Using HotswapAgent to Speed up Development
Uncategorized
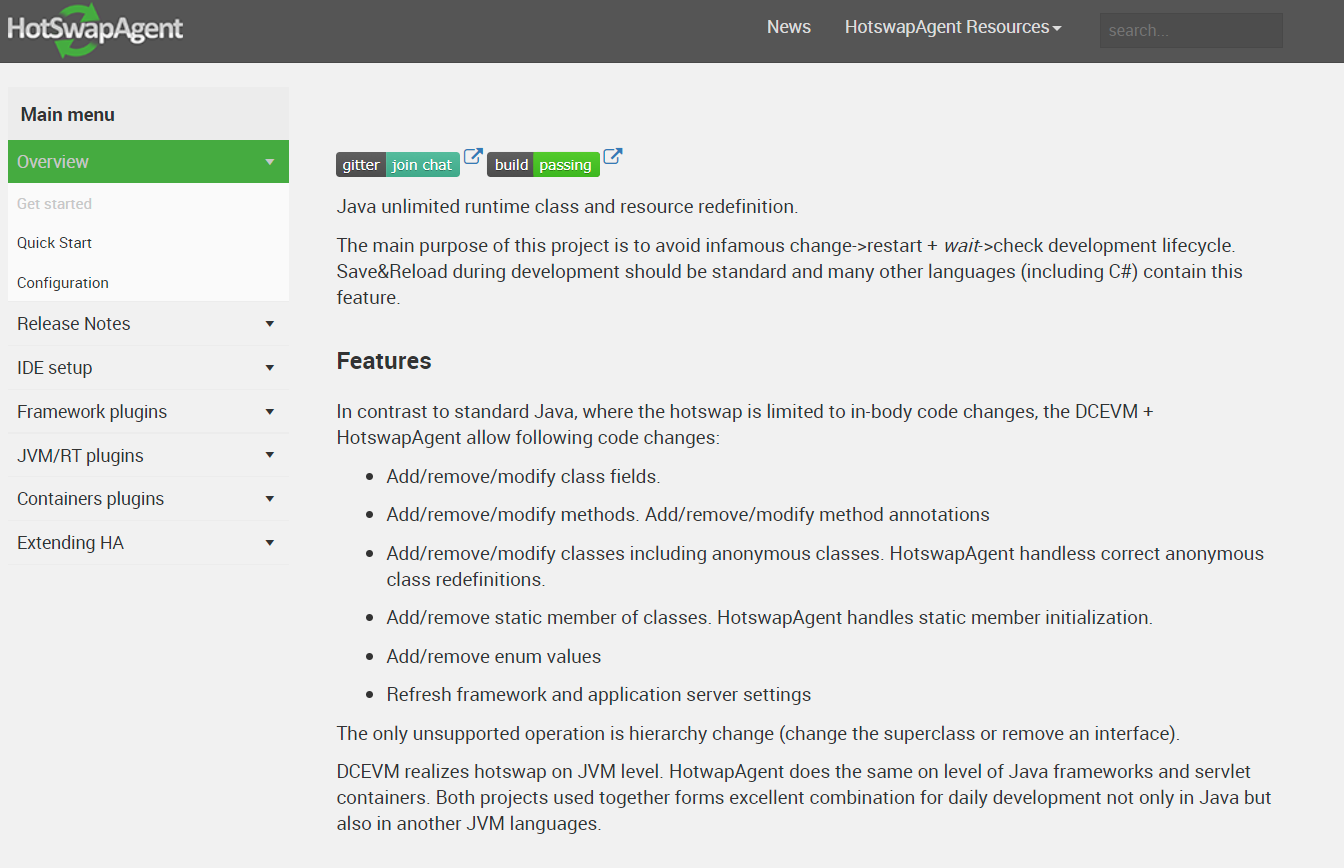
As a Java EE developer, I sometimes envy how fast it’s possible to see the result of a code change in a running application with interpreted languages like PHP or JavaScript. With Java, it’s always necessary to rebuild the source code in bytecode, which can be then safely updated only by restarting the whole application. And all developers know that restoring the desired state of the application after a fresh restart takes time and is tedious.
Many developers know that JRebel can help a lot with updating the code on the fly. There’s been a lot of effort put into it to support all sorts of code and resource changes and refresh them with virtually any Java framework used by the application. But the downside is that it’s pretty expensive for a casual developer, doing just some hacking on his/her own or working on a non-commercial project. I have some experience with JRebel and I liked it a lot, but I was using it on a commercial project where I didn’t pay for the license.
A while ago I came across an open source alternative called HotswapAgent, which has worked very well for me for my personal Java EE projects. In this post, I’m going to write up how I got it running in my IDE and Payara Server.
HotswapAgent itself is just a java agent, which has to be attached to the application. It essentially scans the classpath to detect the presence of known frameworks and tries to refresh the frameworks after a code or resource change is detected. It’s also possible to write custom plugins for any project or even specifically for your application. However, getting the most of HotswapAgent requires installing an alternative DCEVM engine into your JRE installation, which does a much better job in reloading code changes than the standard VM engine in the HotSpot VM. The alternative VM engine is basically a patched version of the standard engine, which improves code hot swap via the debugging interface, without impacting other functions of the JVM.
To summarize, we are going to do this to work with HotSwap from our IDE of choice:
First, download the DCEVM installer for your Java installation. The project is pretty quick to release new versions for new Java updates. At the time of writing this blog post, there was a build for Java 8 update 144 available, released 12 days ago, just a month after the actual Java 8 update 144 had been released. There aren’t releases of DCEVM for every Java update, but I always use the latest version with my Java installation and never had any issues with it.
The installer is a plain executable JAR file, which you can start with java -jar DCEVM-installer.jar . In Linux, I usually start this with admin privileges (using sudo), because it will add/modify files in the Java installation, which is usually read-only for standard users if installed system-wide: sudo java -jar DCEVM-installer.jar
The installer will open a window, which lists all the detected Java installations on the system.
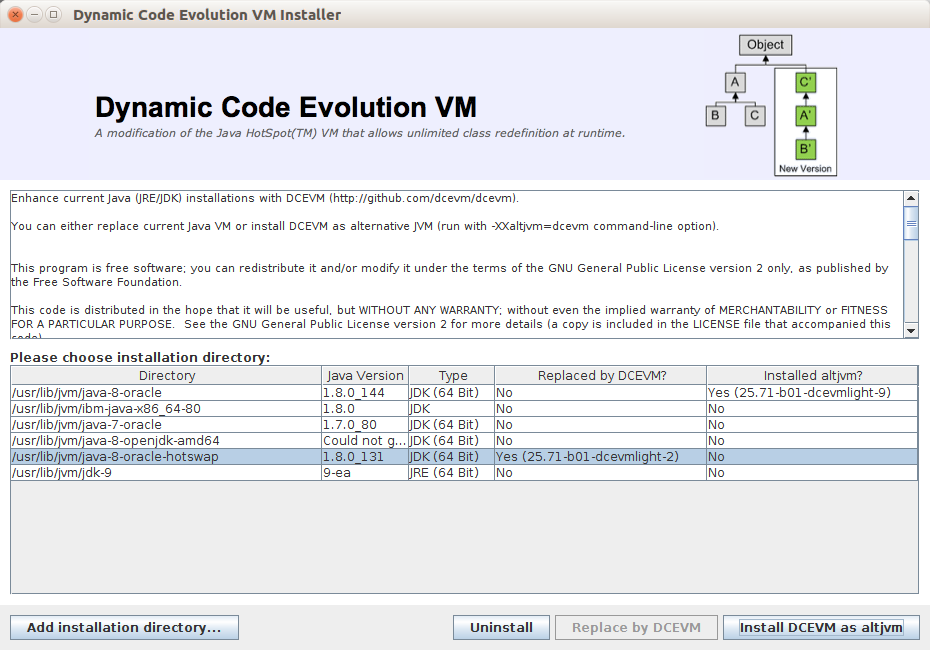
It’s possible to install the DCEVM engine in 2 ways:
If you install DCEVM as an alternative engine, you can enable it by passing the --XXaltjvm=dcevm command line option to the java command along with the other options, like:
java --XXaltjvm=dcevm -Xmx500m -jar application.jar
I was usually successful with installing DCEVM as an alternative engine, which is less intrusive and very transparent. The DCEVM engine can then be enabled by a command line option only if you want it and you can have the same Java installation for both running third-party Java programs and development.
The second option of replacing the current VM engine with DCVEM is convenient if you can’t pass additional command line arguments to the Java program. In that case, I recommend using a separate Java installation to replace the default engine by DCEVM and use it only during development.
In order to enable the HotswapAgent, it has to be passed to the Java program as an agent, via the -javaagentcommand line parameter. Then you have to pass additional parameters to enable the debug mode. Before configuring the IDE, I’ll explain how to start an application from the command line, which is essentially what you need to configure in any IDE.
First, download the HotswapAgent JAR to some shared location. The JAR file will remain there and will be referenced by the -javaagent command line parameter. Additionally, we’ll enable remote debugging on port 9009, with suspend=n so that the application doesn’t wait for the debugger to be attached. We can then attach a debugger at any time we want to update the application with code changes. This is an example of the command line to start an application with the HotswapAgent JAR located in /development/hotswap-agent.jar :
java -XXaltjvm=dcevm -javaagent:/development/hotswap-agent.jar
  -agentlib:jdwp=transport=dt_socket,server=y,suspend=n,address=9009
  -jar application.jar
If you haven’t installed DCEVM as an alternative JVM but replaced the default JVM engine, you should omit the --XXaltjvm=dcevm argument.
To configure HotswapAgent in your IDE, you have to do the following steps:
XXaltjvm=dcevm argument when starting the application in debug mode.Detailed instructions how to do it in major Java IDEs can be found on the HotswapAgent Wiki.
Some frameworks or application servers require additional configuration. This is mostly because the hotswap-agent.jar has to be added to the classpath and the agent isn’t able to modify the classloader to add the required classes automatically, or the framework or server spawns additional JVM process and has to be configured to use a JVM with DCEVM.
To use HotswapAgent with DCEVM while developing applications with Payara Server, the following changes are required:
hotswap-agent.jar into the lib/ext folder in the Payara Server’s domain directory. If you’re using the default domain1 domain, it would be glassfish/domains/domain1/lib/ext/hotswap-agent.jar (this is required to add HotswapAgent JAR to the server’s classpath, at least until HotswapAgent can do it automatically in Payara Server)glassfish/config/asenv.conf (or glassfish/config/asenv.bat on Windows) and specify that the AS_JAVA environment variable points to the Java installation -client or -server JVM options (they would prevent using DCEVM as an alternative engine even if the —XXaltjvm option is present)--XXaltjvm option -javaagent option with the path to the hotswap-agent.jar, e.g. –javaagent:/development/hotswap-agent.jar. It can reference the same JAR file which is in the lib/ext folder, even using a relative reference to the domain folder, like this: -javaagent:${com.sun.aas.instanceRoot}/lib/ext/hotswap-agent.jarIf starting Payara Server from IDE, you may have to apply the step 2. and 3. in the configuration of your IDE, because the Payara Server plugin in most IDEs bypasses the standard Payara Server configuration and starts Payara Server with the Java runtime and command line parameters specified in the IDE. Mind that in that case, you have to use the full path to the hotswap-agent.jar and avoid using the ${com.sun.aas.instanceRoot} variable.
In the IDE, you should also disable automatic redeployment of the application on code change. Most IDE plugins do that by default because under normal circumstances, it’s the only reliable way to update the application to reflect code changes. Since with HotSwapAgent and DCEVM the usual class reloading is enough, automatic redeploy isn’t necessary and should be disabled.
Payara Micro is an application runtime that, unlike application servers, is packaged as a single executable JAR file and can be started as such. It deploys applications passed as command line parameters, within the same JVM process. Therefore it’s very easy to start it with the HotswapAgent in the same way as any other executable JAR:
java -XXaltjvm=dcevm -javaagent:/development/hotswap-agent.jar
  -agentlib:jdwp=transport=dt_socket,server=y,suspend=n,address=9009
  -jar payara-micro.jar --deploy application-war
After it’s started like this, it listens on port 9009 for debugger requests and any IDE can attach its debugger to it.
The web application is deployed from an exploded directory called application-war (not to be confused with a war file package) so that changes in resources like XML or JSF pages are also picked up automatically. Most IDEs support building a web application as an exploded directory. Maven also stages the application in a directory in the target folder before creating the WAR file and you can deploy your application from that directory using Payara Micro.
I’ll quickly summarize the steps required to get HotswapAgent running with Payara Server from the NetBeans IDE.
lib/ext folder in the Payara Server’s domain directory as lib/ext/hotswap-agent.jar-client or -server JVM options --XXaltjvm option-javaagent:${com.sun.aas.instanceRoot}/lib/ext/hotswap-agent.jar optionNow, you can debug the application in a standard way from within NetBeans. The IDE will automatically compile all classes, update them in the server. It will also copy all changed resources into an exploded directory which it used to deploy the application so that these resources are refreshed too, because Payara Server monitors them for changes.
The following steps will get you to get HotswapAgent running with Payara Micro and the NetBeans IDE:
target folder and has the same name as the final WAR file, without the WAR extension application-war and that payara-micro.jar is in the same folder):java -XXaltjvm=dcevm -javaagent:hotswap-agent.jar
-agentlib:jdwp=transport=dt_socket,server=y,suspend=n,address=9009
-jar payara-micro.jar --deploy application-war
{{cta(‘4c7626f5-1e53-418e-90c8-add6e4af19c9′,’justifycenter’)}}
Share:

 7 minutes
Modernizing enterprise applications is a strategic imperative for organizations that want to remain competitive and resilient. According to our […]
 5 minutes
At Devoxx Belgium 2025, I was able to talk about what happens after you build your container. In theory, […]
 5 minutes
You’ve probably been in that hallway conversation (or Teams/Zoom meeting) where DevOps, SRE and Platform Engineering all get thrown around. Sometimes these words are […]
Thank you for this tutorial.
I am currently using NetBeans with the build-in auto-deploy on save to Payara, which takes a few seconds but it is working fine for me so far.
There are some situations where I need to build the whole project and auto-deploy does not work (e.g. after an error in a JPA named query).
What is the advantage of using the HotswapAgent over the build-in auto-deploy and would you say it is worth it?
Hi Simon,
The adventage of HotswapAgent (HA) is basically to save time during development. If classical redeployment works is fast and works for you then HA probably isn’t worth it. However, when your application grows and redeployment takes a lot longer or it takes a lot of time to restore the desired session state, HA make save you a lot of time.
You may also find a few sesonds of redeployment waste of time when designing UI layer and need to make frequent changes in Java code just to tweak UI layout. In that case, HA makes it more pleasent to get a rapid feedback without waiting for redeployment.
In the end it’s up to you to try HotswapAgent and compare it to classical redeployment. We just want to help users of Payara Server to use HotswapAgent when they find it useful.
Hi! Great tutorial. Thanks for it. What you have suggest for multi module project that packages to war with libs?
Hi, Sergey,
HotSwap Agent should work with multimodule projects in the same way as single module projects – you just need to update the classes with the Java debugger from your IDE. The classes don’t have to belong to the same module, HotSwap Agent tries to intercept class loaders and refresh all modules when classes are updated with the Java debugger – in simple words it refreshes the correct modules because it knows to which module the classes belong.
Hi Sergey,
HotswapAgent works equally well with multi-module projects. It uses Java debugger to send the modified code to the running process and it doesn’t matter how the application is package if the IDE can rebuild the code and send the classes over debugging interface.
However, I’m not sure how it works for resources which aren’t code, such as HTML, XML or properties files. I think those are picked up by the server when the application is deployed as exploded directory, with contents unpacked on disk. In that case, files packaged inside nested JARs wouldn’t be reloaded.
Hi,
I have a JEE7 app Payara 4.1.2.174 + JSF2 + RichFaces + PrimeFaces + JPA2 + Hibernate4 + JTA Connection Pool running fine without the above config.
I had configured my env to use HotSwap and had some problems:
1) HotSwap arises many exceptions about some plugins not found like Tomcat, Spring, Maven, etc, that I don’t use in my project. Is there a way to disable checking of these plugins?
2) Is this plugin required? Other error is:
java.lang.NoClassDefFoundError: org/hotswap/agent/config/PluginManager
GRAVE: RAR8061: failed to load resource-adapter-config or RA [ __dm_jdbc_ra ], com.sun.appserv.connectors.internal.api.ConnectorRuntimeException: Failed to start resource adapter : org/hotswap/agent/config/PluginManager
3) I don’t get to run the access to connection pool:
GRAVE: RAR8060: Unable to lookup pool [ sitesat2-isPool ], javax.naming.NamingException: Lookup failed for ‘__SYSTEM/pools/sitesat2-isPool’ in SerialContext[myEnv={java.naming.factory.initial=com.sun.enterprise.naming.impl.SerialInitContextFactory, java.naming.factory.state=com.sun.corba.ee.impl.presentation.rmi.JNDIStateFactoryImpl, java.naming.factory.url.pkgs=com.sun.enterprise.naming} [Root exception is javax.naming.NameNotFoundException: pools]
GRAVE: RAR6017 : Failed to get connection pool object sitesat2-is via JNDI lookup : com.sun.appserv.connectors.internal.api.ConnectorRuntimeException: Lookup failed for ‘__SYSTEM/pools/sitesat2-isPool’ in SerialContext[myEnv={java.naming.factory.initial=com.sun.enterprise.naming.impl.SerialInitContextFactory, java.naming.factory.state=com.sun.corba.ee.impl.presentation.rmi.JNDIStateFactoryImpl, java.naming.factory.url.pkgs=com.sun.enterprise.naming}
4) I think PluginManager from 2) is needed to work 3) because this:
java.lang.NoClassDefFoundError: org/hotswap/agent/config/PluginManager
…
at javax.naming.InitialContext.lookup(InitialContext.java:417)
at javax.naming.InitialContext.lookup(InitialContext.java:417)
at util.MultiEntityManagerImpl.getDataSource(MultiEntityManagerImpl.java:56)
Is there some specific config to work some plugins, mainly the connection to databases + JPA + JTA + Hibernate?
GRAVE: Application deployment failed: Exception while preparing the app
Hi Edilmar,
You can safely ignore warnings from Hotswap Agent plugins, they cause no harm and are there only to let you know that they failed to start and thus will be ignored. You can disable plugins in hotswap-agent.properties: http://hotswapagent.org/mydoc_configuration.html (see an example file here: https://github.com/HotswapProjects/HotswapAgent/blob/749ee6f55c56219af2691e317e74e3085419f7ff/hotswap-agent-core/src/main/resources/hotswap-agent.properties#L34)
For the other problems, it’s possible that you didn’t add the hotswap-agent.jar into the ext classpath correctly. You may try a recent 1.3.0 version of hotswap-agent.jar which shouldn’t require adding it into the classpath anymore.
Please note that Hotswap Agent isn’t maintained by or connected with Payara by any means and Payara project doesn’t support it. If you use it and hit other than configuration issues, you should report them to the Hotswap Agent project. Payara doesn’t provide fixes to improve integration with Hotswap Agent (yet).
with 1.3.0 in Maven repository, it shouldn’t be necessary pass the hotswap-agent.jar argument any more.
When u say:
modify the JVM options:
remove any -client or -server JVM options
add the –XXaltjvm option
is –XXaltjvm without = dcevm?
Hey firuzzZ, the answer is NO, you should add dcevm, the final result is:
“-XXaltjvm=dcevm”
just for reference… the correct way to put the parameter “altjvm” is “-XXaltjvm=dcevm” instead of “–XXaltjvm” to avoid “Unrecognized option: –XXaltjvm” error
perfect workaround after JRebel change myJRebel licence feature for developers
Hi Luiz,
Thank for clarification. It should always be full “-XXaltjvm=dcevm” as you wrote. I used the full argument a couple of times in the article and I hoped that people would get it in other places where I just wrote “XXaltjvm”.
Just a little clarification – HotSwap Agent is not a complete replacement to JRebel, just an opensource and free alternative and you may say a “workaround” when you can’t afford to pay for a JRebel license. Hotswap Agent works in far fewer cases than JRebel and thus requries far more redeployments and saves less time. Hotswap Agent also relies on the DCEVM project, which is currently almost unmaintained and it’s not sure whether it will support JDK 9+ in the future.
Dcevm11 beta is available at https://github.com/HotswapProjects/openjdk-jdk11
See also the Manik-Hot-Deploy Plugin supporting Payara server
https://github.com/imixs/manik-hot-deploy/wiki