Securing Payara Server with Custom SSL Certificate
Security
One of the most common administration tasks with Payara Server, as well as with any web server, is to set up certificates to secure either HTTP protocol or remote access to Payara Server administration interface. You might have a self-signed certificate or a certificate signed by a trusted authority. In both cases it is pretty easy to add them to a Payara Server domain and use them to secure communication channels.

Overview of the Steps Described in this Guide
The process of securing your Payara Server with new certificates involves several steps, which are worth summarising here:
In order to follow this guide, you will need:
In most cases, you would want to use an SSL certificate created and signed by a Certificate Authority (CA). Often you would create a Certificate Signing Request (CSR), send it to a CA and then get the SSL certificate from the CA. Payara Server Enterprise makes this very easy and provides the commandgenerate-csr to generate a CSR. Alternatively, you can use openssl orcertreqto generate a CSR.
If you want to follow this guide with a new self-signed certificate instead, you can either create it directly using Payara Server Enterprise or by a third-party tool like openssl.
Payara Server Enterprise offers thegenerate-self-signed-certificatecommand to generate a self-signed certificate right in the domain configuration. With this command, you can skip all the steps requried to generate a certificate outside of Payara Server and import it into the domain. You can generate a self-signed certificate using Payara Server Enterprise with the following asadmin command:
asadmin generate-self-signed-certificate --dn "C=UK,O=Payara,CN=payara.fish" mydomain_certificate
The generated certificate will be automatically stored in the Payara key store and trust store under alias mydomain_certificate. This means you can now skip bundling the private and public keys and importing them to Payara’s keystore and trust store and you can jump right to configuring Payara Server to use this certificate alias.
Alternatively, you can generate self-signed private and public key using openssl:
openssl req -x509 -newkey rsa:4096 -keyout mycert.key -out mycert.crt -days 365

If you acquired your certificate from a trusted authority, your keys might be already bundled. This is often the case with certificates signed by a trusted authority. If your bundle is in a different format than PKCS12, you need to specify a different store type for some operations, or export the keys in PKCS12 format.
For the purpose of this guide, it is not important whether the certificate is self-signed or it is signed by a certification authority. The only difference between them is how the certificates are obtained. If authentication is not a concern, for example if all the communication will be private and behind a firewall, then it is sufficient to use self-signed certificates. However, it is useful to obtain and use a CA certificate for HTTPS connections available to the outside world to increase trustfulness and prevent forgery attempts.
In order to operate with keystores, we will use keytool executable available in bin directory of your JDK installation.
All the configuration changes happen inside the config folder of your domain. In order to make the steps simple, we start by copying both certificate public and private key files into this folder – let’s copy mycert.cer and mycert.key into <Payara_install>/glassfish/domains/mydomain/config. If you already have a bundle with public and private key, copy it to config directory – we will assume its file name is mycert.p12.
It is also recommended to stop the Payara Server domain before proceeding with the steps. For some actions we will need to start the domain, but the guide will explicitly mention that.
Before we can access certificate keystores, we need to make sure that we set Payara Server domain master password. This password is used by the Payara Server to access keystores. You will need to use the same password to access keystores later.
The default master password is changeit. You may want to change it by following command:
asadmin change-master-password --savemasterpassword=true mydomain
This command will ask you for a new master password. Please, remember it, as it will be also used to encrypt/decrypt the keystore files and to decrypt any included key bundles. Using --savemasterpassword=true will save the password to the disk so that asadmin start-domain command doesn’t prompt for password. If you don’t want to store the password, omit this option.
In order to secure inbound connections, such as HTTP listeners, we need to put the certificate keys into a keystore file keystore.jks in the domain config folder. Before we do that, we need to bundle the public and private key together into a PKCS12 bundle file. Mind that the final PKCS12 bundle file needs to be encrypted with the same password which we use as the domain master password. Also make sure that the certificate’s private key (mycert.key) should be encrypted using the same password. The bundle will be later added to the a keystore accessed by Payara Server, which will use the domain master password to open the keystore and also decrypt all bundles and keys inside it.
The keytool command does not support creation of PKCS12 bundles, therefore we must use other means. There are different steps involved, depending on your operating system.
Creation of the PKCS12 Bundle in Linux
In Linux, creation of the bundle using openssl is pretty straightforward:
openssl pkcs12 -export -in mycert.crt -inkey mycert.key -out mycert.p12 -name mydomain_certificate
Path to the public key is given by the -in option, path to the private key is given by -inkey option, and filename of the created bundle is given by -out option. We also need to give the bundle an alias by -name option.
You will be asked for a new password to the created bundle, which is essentially a new keystore, similar to cacerts.jks and keystore.jks. Remember to use the same password as the master password used for the Payara domain.
You may also see what is inside the new bundle, using keytool:
keytool -list -keystore mycert.p12
Creation of the PKCS12 Bundle in Windows
In order to create a bundle from mycert.crt and mycert.key, the most straightforward way is again using openssl, or some other similar tool (like MakeCert). However, they are not available in default Windows installation.
If you already have a certificate signed by a trusted authority, you may import it into Windows store and export it in PKCS12 format, all using Microsoft Management Console (mmc). The signed certificate bundle must have exportable private key. If not, you might try to use the bundle as is – if it does not have PKCS12 format, you need to specify the correct format instead of PKCS12 in some commands later on.
When exporting the bundle, remember to check the option Yes, export the private key, as well as Include all certificates in the certification path if possible and Export all extended properties
To be consistent with the rest of this guide, save the exported bundle into file named mycert.p12.
Microsoft Management Console does not provide an option to assign an alias to the certificate manually. It generates the alias for you, unfortunately the alias often appears like this: {fa2ds2d3-z13b-492d-2c83-f5z215432p2k}. This alias needs to be used later whenever we use alias mydomain_certificate in this guide.
Import the PKCS12 Bundle to the keystore
In previous steps we have created a new keystore bundle with both public and private keys of your certificate. You may see what is inside the new bundle, using keytool:
keytool -list -keystore mycert.p12
This command will ask for password given at creation of the bundle, and will list information about your certificate, together with the alias given to the certificate. The alias is important, as we will use it later to refer to our certificate.
Finally, we need to import the PKCS12 bundle into the keystore in our Payara Server domain. The command keytool will gain do the trick:
keytool -importkeystore -destkeystore keystore.jks -srckeystore mycert.p12 -srcstoretype PKCS12 -alias mydomain_certificate
In the above command, we want to import into keystore.jks another keystore (our bundle) mycert.p12 of type PKCS12, and from that keystore we select only the certificate with alias mydomain_certificate.
This step involves adding the public key of your certificate or the whole PKCS bundle into the keystore file of trusted certificates in Payara Server domain. This is to make the server recognize the certificate as trusted, in case an external party or another Payara Server instance provide it. This step is optional, if you only intend to secure inbound channels, such as HTTP listeners. But it will do no harm to follow the procedure in any case.
The default keystore file for trusted certificates can be found at <Payara_install>/glassfish/domains/mydomain/config/cacerts.jks.
We need to import our public key file (mycert.crt) into the cacerts.jks keystore with following command:
keytool -importcert -trustcacerts -destkeystore cacerts.jks -file mycert.crt -alias mydomain_certificate
The command will ask for password to the cacerts.jks keystore – this should be the same password as the domain master password.
In case of PKCS bundle (mycert.p1
2), following command will do the same
keytool -importkeystore -destkeystore cacerts.jks -srckeystore mycert.p12 -srcstoretype PKCS12 -alias mydomain_certificate
The certificate will be installed under alias mydomain_certificate.
If you already have a certificate in your domain and you want to replace it because it will expire soon, you might want to replace it with a new one. In order to do it so that no further configuration changes in the domain are required, you need to remove the old certificate first, before installing the new certificate. Following keytool command will do that:
keytool -delete -alias mydomain_certificate -keystore keystore.jks
To replace the certificate also in trusted certificates keystore, issue the same command also for cacerts.jks file:
keytool -delete -alias mydomain_certificate -keystore cacerts.jks
After removing the old certificate, continue adding the certificate as described before. Just remember that the certificate is referred to in the domain configuration by its alias, therefore the alias of the new certificate must be the same as the alias of the old certificate.
If you want to replace the certificate used by secure admin, it is recommended to refresh all the secure admin settings by running command to turn on secure admin (even if it is already on):
asadmin start-domain mydomain (if domain not yet started)
asadmin enable-secure-admin
asadmin restart-domain mydomain (to apply changes)

At this point, the certificate is available for use in your domain. You may use it to secure an HTTP listener or replace the default certificate for the listener http-listener-2, which is secured by default.
First, we need to start the server with our domain
While server is running, we can use either asadmin CLI or the Admin Console in the web browser to configure the HTTP listener.
Securing HTTP Listener using Admin Console
Open Admin Console in your browser, by default it is located at http://localhost:4848/.
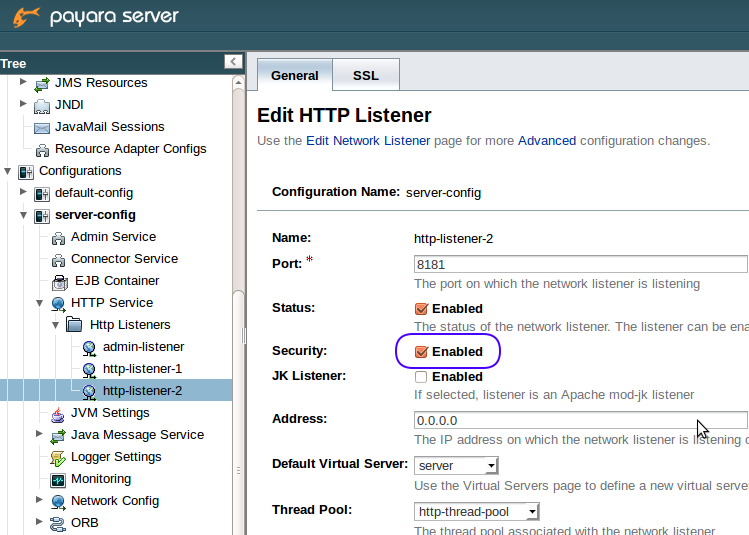
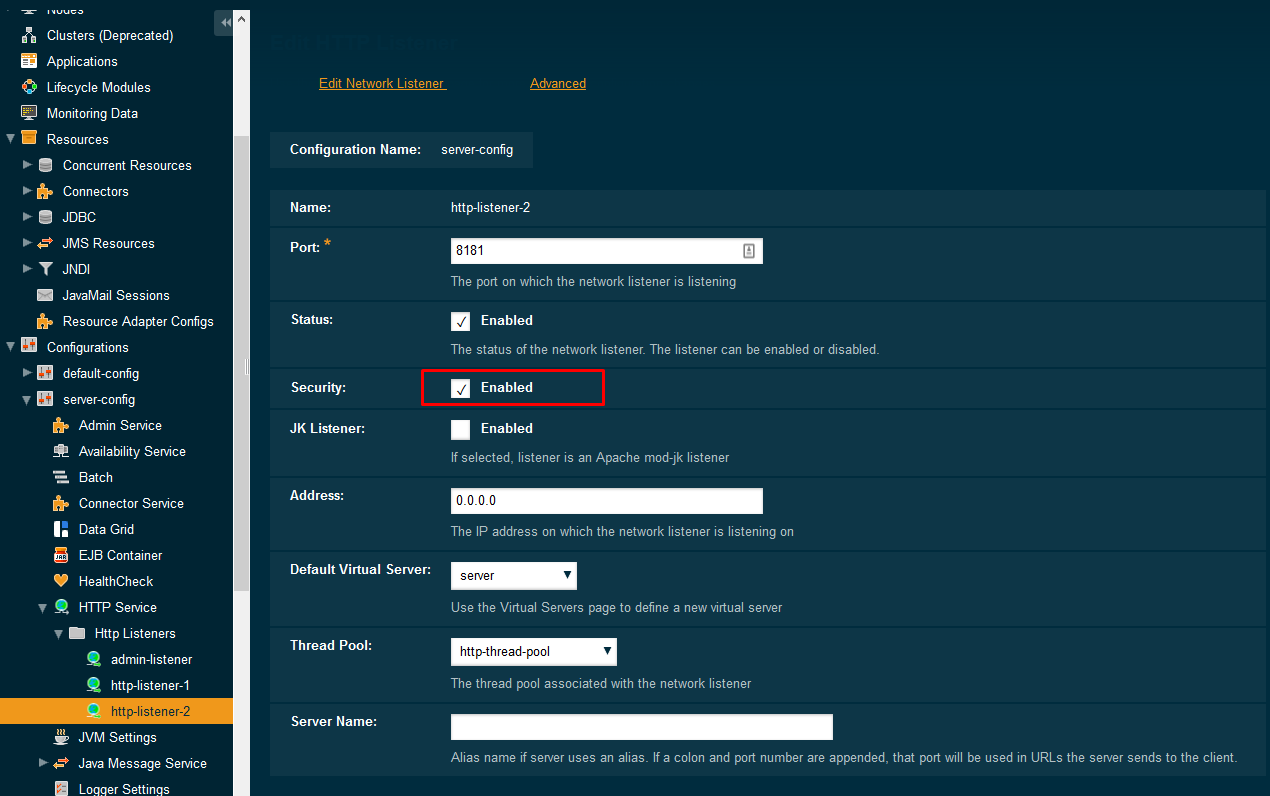
Go to Configurations -> server-config -> HTTP Service -> HTTP Listeners > my-http-listener, where my-http-listener is the HTTP listener you want to configure. By default, there already exists http-listener-2, which is already secured by TLS protocol, using default certificate with alias s1as and listens on port 8181.
If you are adding security to an insecure listener, make sure that security is enabled, as in the following picture:
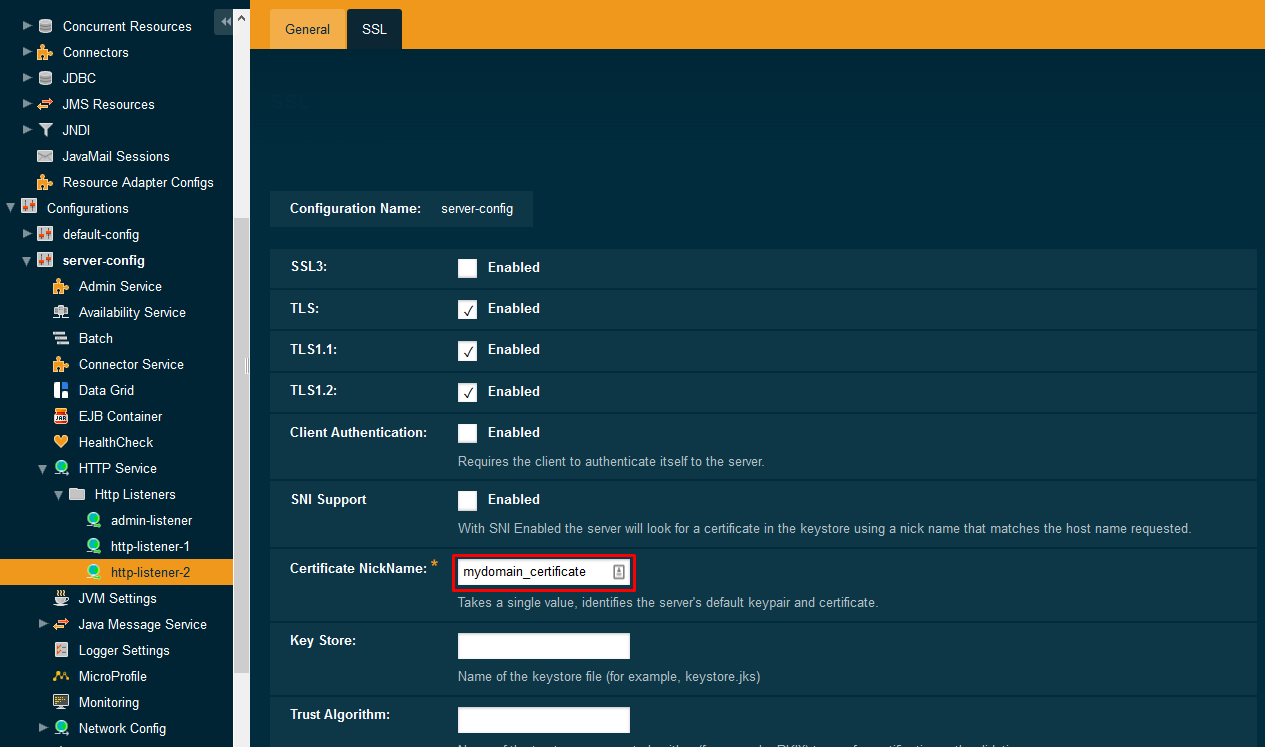
On the SSL tab, TLS should be enabled. It is not recommended to enable SSL3, as it is superseded by TLS protocol and is not widely used. Moreover, there are some security issues with SSL3 protocol.
On the SSL tab, we also want to apply our new certificate – Certificate NickName should contain the alias of our certificate. In our case it is mydomain_certificate.
If you are not sure about the alias of your certificate, use following command to find out its alias from the mycert.p12 bundle:
keytool -list -keystore mycert.p12
If you run the same command against keystore.jks file, you will see the same certificate among other certificates already in the domain keystore (there are already 2 certificates by default: glassfish-instance and s1as).
Finally, you may test the configuration changes in your web browser. With a web application deployed at context root webapp and listener using port 8181, open the following address and check that the connection is secured using the new certificate: https://localhost:8181/webapp or <a href=”https://:8181/webapp”>https://<yourdomain>:8181/webapp.
Securing HTTP listener using asadmin
With asadmin, each configuration step is represented by one or more asadmin CLI commands, which set configuration properties using dot notation:
asadmin set configs.config.server-config.network-config.protocols.protocol.http-listener-2.security-enabled=true
asadmin set configs.config.server-config.network-config.protocols.protocol.http-listener-2.ssl.tls-enabled=true
asadmin set configs.config.server-config.network-config.protocols.protocol.http-listener-2.ssl.tls11-enabled=true
asadmin set configs.config.server-config.network-config.protocols.protocol.http-listener-2.ssl.tls12-enabled=true
There are 3 versions of TLS protocol available. It is good practice to enable all 3 versions to degrade gracefully for older clients. But you may turn on only TLS 1.2 as well, if you only run the last command. You don’t get such granularity when using admin console.
asadmin set configs.config.server-config.network-config.protocols.protocol.http-listener-2.ssl.cert-nickname=mydomain_certificate
It is possible to secure connections to admin console in a similar way as to any other HTTP listener. However, it is only recommended to turn on SSL security on admin listener when you need to access the Admin Console or run asadmin commands remotely and using the domain name that matches your certificate. Also mind that SSL will be used for communication between instances and domain admin server within a cluster.
If you really need to secure admin listener, repeat the same steps in admin console as for other HTTP listeners, with following exceptions:
asadmin change-admin-password
Before admin security is enabled:
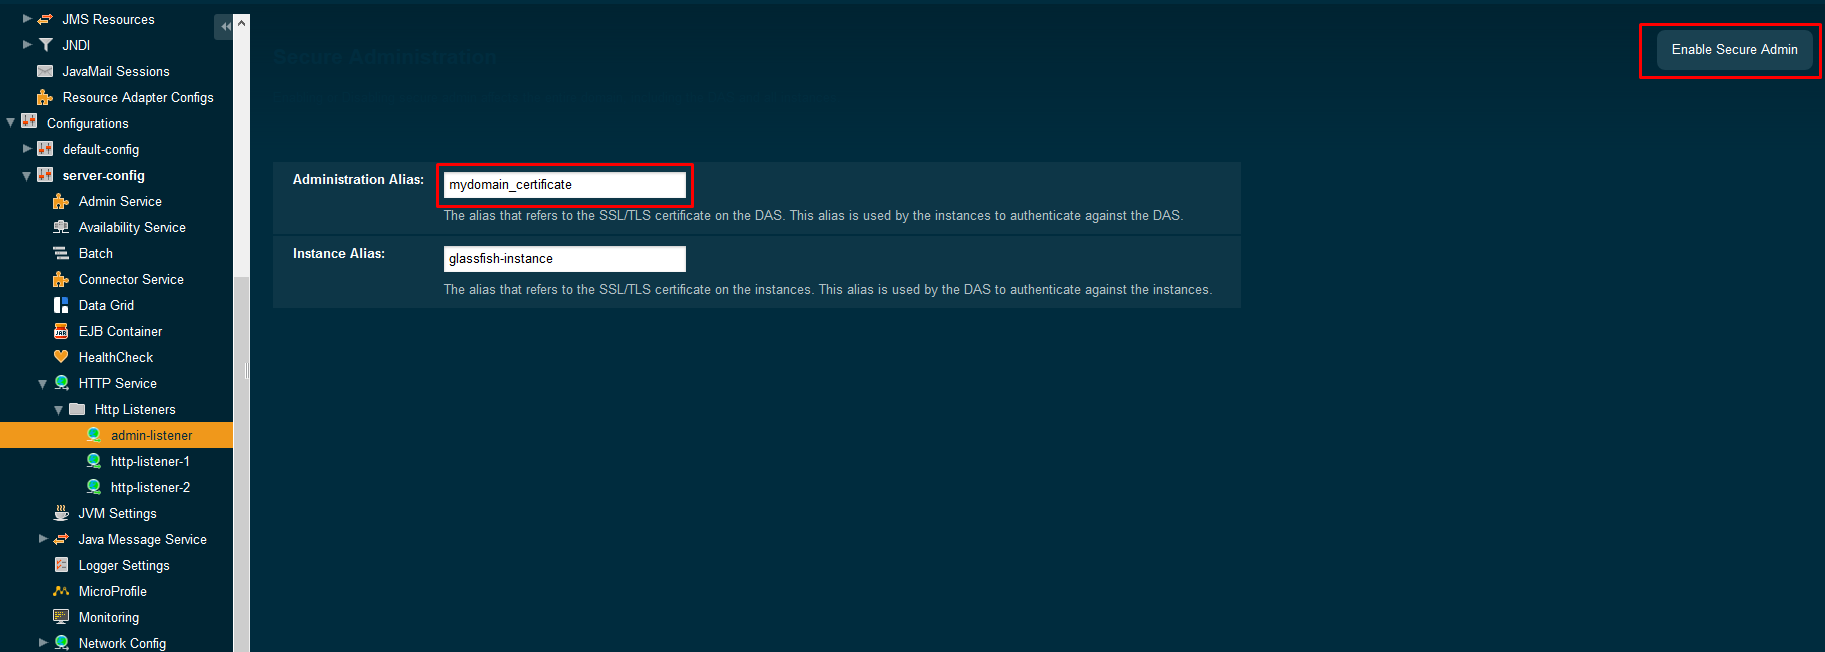
After admin security is enabled:
Again, secure admin listener can be enabled also by asadmin command:
asadmin enable-secure-admin --adminalias=mydomain_certificate
After this command you need to restart the server, as well as other instances in the domain.
If you need to tweak the configuration further, you may use the same asadmin commands with admin-listener as with other HTTP listeners.
Hopefully you now understand how to add certificates into Payara Server and how to use them to secure communication with SSL. Although it is not difficult, it requires to do several steps, involving openssl, keytool, and the Admin Console. We have tried to provide explanation for all the necessary and optional steps, with alternative ways to accomplish them in different operating systems and using either the Admin Console or asadmin CLI. It is up to you to decide which approach fits you better to accomplish your security requirements.
Need help with the Payara Platform in production? Learn about Payara Enterprise

Share:

 4 minutes
Zero Trust security has moved from buzzword to necessity. The principle is simple: never trust, always verify. But implementing […]
 5 minutes
At Devoxx Belgium 2025, I was able to talk about what happens after you build your container. In theory, […]
 2 minutes
How outdated Java systems are draining budgets and throttling innovation across financial services? Let’s dig in in this blog […]
Thank you for the tutorial. I tried it with Payara 4.1.1.154, but I got only exceptions when I wanted to start the domain.
MultiException stack 1 of 4
java.lang.Error: java.security.UnrecoverableKeyException: Cannot recover key
at com.sun.enterprise.security.ssl.SSLUtils.getSSLContext(SSLUtils.java:160)
MultiException stack 2 of 4
java.lang.IllegalStateException: Unable to perform operation: post construct on com.sun.enterprise.security.ssl.SSLUtils
at org.jvnet.hk2.internal.ClazzCreator.create(ClazzCreator.java:392)
MultiException stack 3 of 4
java.lang.IllegalArgumentException: While attempting to resolve the dependencies of com.sun.enterprise.security.SecurityLifecycle errors were found
at org.jvnet.hk2.internal.ClazzCreator.resolveAllDependencies(ClazzCreator.java:246)
MultiException stack 4 of 4
java.lang.IllegalStateException: Unable to perform operation: resolve on com.sun.enterprise.security.SecurityLifecycle
at org.jvnet.hk2.internal.ClazzCreator.create(ClazzCreator.java:386)
Are there any common pitfalls? All steps were successful, except the final start of the domain.
Thanks, Simon, for the question. I reviewed my guide and I realized I forgot to mention that it is necessary to always use the same password for all of these: – Payara domain master password – PKCS12 bundle mycert.p12 – Payara domain keystore keystore.jks – Payara domain trusted keys store cacerts.jks I speciically didn’t mention that also the PKCS12 has to be created with the same password. Payara Server uses domain master password to open both the key stores and also all bundles within the key stores. The only password that can be different is the admin password, which is used to secure administration interfaces. Please try to recreate the PKCS12 bundle with the domain master password and replace the existing certificate in the keystores (according to “Replacing an old certificate” section). Thank you for your feedback, and I hope you’ll be successful this time!
My reply lost formatting, so I’l just summarize again: the advise is to use the same password everywhere, except the admin password. The password must be the same for all these: Payara domain master password; PKCS12 bundle mycert.p12; Payara domain keystore keystore.jks; Payara domain trusted keys store cacerts.jks
Brother, I feel your pain! I spent two extremely frustrating weeks trying to get Glassfish and Payara to accept a Let’s Encrypt certificate only to experience nothing but failure. Unfortunately, I was effectively looking in the wrong place as the problem was in the Glassfish/Payara server itself which was throwing exceptions.
I tracked this down (fairly quickly, actually) to not having the necessary version of Java. Once I replaced the Java version with a later one that actually worked (build 1.8.0_211-b12) at least the exceptions stopped being thrown. That was for Payara and I found out that for Glassfish I had to use an EARLIER version of Java – so I just stuck with Payara as it was working with what I had.
The one benefit of this otherwise colossally fruitless effort was that I created a script (because I couldn’t trust myself to remember each step exactly) which does all the necessary steps to set up Let’s Encrypt certificates (takes about 5 minutes to run) and then provides the means for automatically renewing them via a cron job.
For anyone interested, the script is here:
https://github.com/hbrednek/letsencrypt_glassfish
I put a lot of work into making it complete and well documented. I hope someone else can profit from this.
Cheers —
Hi, wahts the public key? Is this the CSR? I only have a Request CSR, private Key and boundle
I have set this up three times and on all three environments I can’t restart instances in the DAS without getting this error. I am able to start the instance by following the instructions in the error message.
Could not start instance js-beta02-app1 on node js-beta02 (js-beta02). Command failed on node js-beta02 (js-beta02): The Master Password is required to start the domain. No console, no prompting possible. You should either create the domain with –savemasterpassword=true or provide a password file with the –passwordfile option. Command start-local-instance failed. To complete this operation run the following command locally on host js-beta02 from the GlassFish install location /home/glassfish/payara41: lib/nadmin start-local-instance –node js-beta02 –sync normal js-beta02-app1
Hi John,
Judging from the error message, in particular from “No console, no prompting possible.”, you are starting the domain from a script (e.g. a system service) and not from a console, is it correct? In that case it is necessary to provide the domain password to the start-domain command as the error message specifies. If you start the domain from a console, the command would ask for the domain password.
The section “Change domain master password” of this blog describes the command to change the domain master password, together with saving the password locally for future with the –savemasterpassword=true option. If it doesn’t work, then you’re probably starting the domain under a different user than the one, under which you executed the change-master-password command. In that case, either run the change-master-password command again under the user that is used to start the domain (probably root), or the provide the password via the –passwordfile option.
I reran this to be sure and tried everything again with no luck
asadmin change-master-password –savemasterpassword=true payaradomain
The domain starts fine without prompting for a password.
asadmin start-domain payaradomain
Everything was working fine until I first ran the change-master-password command when I was installing a SSL cert. Now I cannot start instances in a cluster (they are on other nodes from the DAS). The certificates work so it sync’ed that over to the instances but it is like the master-password information is not on the instances.
Do I need to copy the master-password file to the nodes and put it somewhere they can start without prompting? Thanks for your help
Hi John,
I’m sorry, I didn’t realize you are trying to start instances on a different machine than the DAS.
In that case, you need to run the exact same change-master-password command on each remote machine, so that the password is stored on each machine, otherwise you need to provide an additional password file. The password is always stored only on the machine where you execute the command.
Thanks Ondrej, I finally figured it a few days ago.
This might only apply to people that are running instances on separate nodes from their DAS but just so it is clear for others, when you load the secure certificates on your DAS using the keytool commands, the keystore files get pushed to the other nodes automatically. When you tell the cluster you use the secure cert, it will try to access the cert in the keystore file but won’t have access to read them (and give you an error and won’t start the instance. You can start it by hand on each instance after suppling the admin and master passwords.) To have the instance start automatically you need to put a master-password file on each node. You can create the instance with this command that is using the secure certs by running this from each node. Hopefully this makes sense and helps some others.
./asadmin –host DAS-SERVERNAME create-local-instance –cluster CLUSTERNAME(case sensitive) –node NODENAME –savemasterpassword true INSTANCENAME
Thanks, John, for sharing your solution!
I didn’t know that you can save master password on instance creation. In fact, it should be enough to save the masster password for one of the instances per node, because the password file is saved to the node directory and is then shared by all instances.
In case you would want to change the master password later, you would need to run change-master-password command for DAS and for each node separately, specifying the –nodedir argument for each node. The password file from node directories would then be transmitted to remote instances .
Please can you advise with regards to this guide. In the section:
Add certificate to the list of trusted certificates
is says to import the public certificate under alias name mydomain_certificate and the bundled key and public certificate pkcs12 file under the same alias mydomain_certificate and when I try to import the pkcs12 bundle it asks if I want to overwrite the existing certificate with the same alias for cacerts.jks.
Please advise what to do here and what is intended here.
Kind regards,
Hi, Clinton,
It seems you’re trying to import both the public certificate and the pkcs12 bundle. But you should import only one of those, because they contain the same information. Only the public certificate is needed, so there’s no point to import the pkcs12 bundle if you already imported it. Importing pkcs12 bundle is only convenient if you don’t have the publi certificate in a separate file, only inside a pkcs12. Therefore just skip importing your pkcs12 and all should be fine.
I followed all process. I am trying to import godaddy certificate however whenever i am trying to access SSL port i got connection reject error.
Hi Sandesh,
Make sure you access the secured SSL port, which is usually 8181 and is different from the unsecured HTTP port. Also make sure that you access the port using HTTPS, not by plain HTTP.
In the default configuration, the URL in the browser should be: https://localhost:8181/
If you still have issues, please use the Payara forum to ask the question and post more details about the error: https://groups.google.com/forum/#!forum/payara-forum
What port are you hitting? I think the default port is 28181.
Thank you very much for this great tutorial. I was able to adjust some steps and to get letsencrypt certificate working on my website.
You are most welcome!
Thanks for sharing the good news with us, Mike! If you find some time to write about how made Payara work with Let’sEncrypt we can republish it on this blog. Feel free to send us your article to info@payara.fish
Thank you for this post.
I also wrote about HTTPS on Glassfish (with Let’s Encrypt) here: http://www.amihaiemil.com/2017/10/03/letsencrypt-glassfish-ec2.html
Although it’s a rather novice post compared to this one.
I wanted to ask, do you think it would be possible to have a Docker image with a JavaEE platform and trusted HTTPS out of the box, given we have the automatic mechanism of Let’s Encrypt?
Surely, such an image would have to be parameterized somehow but nevertheless, I am surprised we don’t have such a thing yet — at least I couldn’t find any. Maybe it is not possible?
Hi Mihaa,
Thanks for sharing your blog post! Would you mind if we updated it for Payara and reposted it on our blog with your name as the author?
Ad. your question: Let’s encrypt generates certificates against a publicly accessible domain so this can’t happen when the docker images are built. It should be possible to update the docker image to generate the Let’s encrypt certificate when the container is started. I’ll try following your blog post and update the docker image if I can. You can also contribute to Payara docker images with a PR on github: https://github.com/payara/docker-payaraserver-full
Hi Ondrej
Sure, you can republish the article.
Thanks for explaining the Docker part. But note that the article contains nothing about Docker, this was just a question on the side of the topic.
The article simply offers a small tutorial on how to install the Let’s Encrypt certificare manually on Glassfish (deployed on AWS EC2).
Best regards,
Mihai
great post, with little effort I was able to incorporate in my setup scripts!
I have this problem while trying to enable TLS1.2
remote failure: Dotted name path configs.config.server-config.network-config.protocols.protocol.http-listener-2.ssl.* not found.
Command get failed.
Hi Ricardo,
Do you have http-listener-2? If not, try using a listener which is available. If yes, did you enable security on this listener?
Hello Ondrej,
I scrupulously followed your tutorial to set up a self-signed certificate. No worries when creating the certificate, setting it up or starting payara. However, as soon as I want to activate security on my Payara instance, I get this very nice message:
bash-4.2$ ${PAYARA_DIR}/bin/asadmin –user=${ADMIN_USER} –passwordfile=${PASSWORD_FILE} enable-secure-admin
Command enable-secure-admin not found.
Check the entry of command name. This command may be provided by a package that is not installed.
Closest matching local and remote command(s):
enable-secure-admin
enable-secure-admin-internal-user
enable-secure-admin-principal
Command enable-secure-admin failed.
Any idea where the problem came from?
Hi Thierry,
When you execute the ‘enable-secure-admin’ command, is the server running at that time?
You can verify the domains which are running with the ‘list_domains’ command and start one of them with ‘start_domain ‘ command.
If you still have some problems, we can carry on the investigation through the Payara Forum (https://groups.google.com/forum/#!forum/payara-forum).
Regards
Rudy
Hello Ondrej Mihályi ,
Thank you for this tutorial. I was able to do all the steps, but when it comes to set the alias name in payara configuration panel, it shows a message:
Network Listener named http-listener-1 to which this ssl element is being added already has an ssl element.
Do you know what is this about?
Thanks in advance
Hi Emmanuel,
It looks like this is a bug in the Admin Console. Feel free to report it on Payara github: https://github.com/payara/Payara/issues/
The Admin Console attempts to create a new configuration element but there’s already an existing (empty) config element for SSL.
Luckily, there’s an easy workaround – you can use the asadmin command line tool to set the certificate nickname, which works. The following command would set it for http-listener-1:
asadmin set configs.config.server-config.network-config.protocols.protocol.http-listener-1.ssl.cert-nickname=mydomain_certificate
Or you can also modify the file domain.xml directly and remove an empty element from the http-listerner-1 configuration, restart the server and then Admin Console will be able to save your changes.
Domain is not starting after changed the master password and keystore and trust store password.
Getting the error mentioned below.
[2020-12-30T14:19:32.990+0100] [Payara 4.1] [WARNING] [] [org.glassfish.grizzly.filterchain.DefaultFilterChain] [tid: _ThreadID=45 _ThreadName=http-thread-pool::http-listener-2(8)] [timeMillis: 1609334372990] [levelValue: 900] [[
GRIZZLY0013: Exception during FilterChain execution
java.lang.NullPointerException
at org.glassfish.grizzly.ssl.SSLEngineConfigurator.createSSLEngine(SSLEngineConfigurator.java:214)
at org.glassfish.grizzly.ssl.SSLEngineConfigurator.createSSLEngine(SSLEngineConfigurator.java:186)
at org.glassfish.grizzly.ssl.SSLBaseFilter$SSLTransportFilterWrapper.handleRead(SSLBaseFilter.java:1137)
at org.glassfish.grizzly.filterchain.ExecutorResolver$9.execute(ExecutorResolver.java:119)
at org.glassfish.grizzly.filterchain.DefaultFilterChain.executeFilter(DefaultFilterChain.java:284)
at org.glassfish.grizzly.filterchain.DefaultFilterChain.executeChainPart(DefaultFilterChain.java:201)
at org.glassfish.grizzly.filterchain.DefaultFilterChain.execute(DefaultFilterChain.java:133)
at org.glassfish.grizzly.filterchain.DefaultFilterChain.process(DefaultFilterChain.java:112)
at org.glassfish.grizzly.ProcessorExecutor.execute(ProcessorExecutor.java:77)
at org.glassfish.grizzly.nio.transport.TCPNIOTransport.fireIOEvent(TCPNIOTransport.java:539)
at org.glassfish.grizzly.strategies.AbstractIOStrategy.fireIOEvent(AbstractIOStrategy.java:112)
at org.glassfish.grizzly.strategies.WorkerThreadIOStrategy.run0(WorkerThreadIOStrategy.java:117)
at org.glassfish.grizzly.strategies.WorkerThreadIOStrategy.access$100(WorkerThreadIOStrategy.java:56)
at org.glassfish.grizzly.strategies.WorkerThreadIOStrategy$WorkerThreadRunnable.run(WorkerThreadIOStrategy.java:137)
at org.glassfish.grizzly.threadpool.AbstractThreadPool$Worker.doWork(AbstractThreadPool.java:593)
at org.glassfish.grizzly.threadpool.AbstractThreadPool$Worker.run(AbstractThreadPool.java:573)
at java.lang.Thread.run(Thread.java:748)
Please help to resolve it asap.
Dear Munenedra,
Make sure that you followed the blog post carefully and that the Payara Master password is the same as the password of all the imported certificate bundles and of the keystore and trust store. Even imported certificate bundles need to have the same password as Payara Master password, otherwise Payara is able to open the key store but not individual keys in the key store.
Note that the Payara Server 4.x is not supported for the public community anymore. Please upgrade to the latest Payara Server Community 5 or contact our Sales team if you’d like to become Payara Enterprise customer with full support. Otherwise we’re not able to give you much advice. If your company is already Payara Enterprise customer, please contact us through the Payara Customer Hub.
If you need more advice, you might be able to get it from other Payara Community users if you ask on Payara Forum: https://payara.org/forum
How do you enable sslv2hello for the TLS 1.2 legacy compatibility with client hello?
Dear John,
The sslv2hello protocol is disabled in Java by default since Java 7. Payara Server 5 requires Java 8 and doesn’t support this protocol. There’s currently no known and supported way to enable support for sslv2hello.
It’s possible that somebody from the Payara user community may know a solution to this, it’s worth asking in Payara Forum at https://payara.org/forum. We won’t add official support for the legacy sslv2hello protocol unless it’s seriously needed by our customers.
I’ve done all steps, but I cannot reach neither admin console nor project itself.
I am very new on certification. I am learning.
I’m working for a university. The IT department gave me some files to make my project SSL certificated.
There 4 files in rar:
Wildcard2022.pfx
Wildcard2022 key.txt
STAR_xxx_edu_tr.crt
STAR_xxx_edu_tr.ca-bundle
I’ve used only Wildcard2022.pfx file with it’s key. Because it is a PKCS12 file.
I don’t have any idea about the files starting with “STAR”. These files seem specific for our university, because they have domain name (xxx_edu_tr) within the file name.
So how can I use these files? Or do I really need them?
Your best bet is probably to post on https://forum.payara.fish/ where someone might help with guiding you through the basics of SSL certificates. As there is no easy answer.
The problem is fixed.
I didn’t omit the following warnings, then it is fixed.
Warning:
The JKS keystore uses a proprietary format. It is recommended to migrate to PKCS12 which is an industry standard format using “keytool -importkeystore -srckeystore keystore.jks -destkeystore keystore.jks -deststoretype pkcs12”.
Warning:
The JKS keystore uses a proprietary format. It is recommended to migrate to PKCS12 which is an industry standard format using “keytool -importkeystore -srckeystore cacerts.jks -destkeystore cacerts.jks -deststoretype pkcs12”.
Dear Ondrej Mihályi!
My have a problem.
I did it successfully ssl certificate, its work, but my applications have a problem when i deploying:
Error occurred during deployment: Exception while loading the app : CDI definition failure:Exception List with 1 exceptions: Exception 0 : java.lang.RuntimeException: java.lang.RuntimeException: java.io.IOException: Keystore was tampered with, or password was incorrect at org.glassfish.security.services.impl.JCEKSPasswordAliasStore.containsKey(JCEKSPasswordAliasStore.java:169) at fish.payara.nucleus.microprofile.config.source.PasswordAliasConfigSource.getValue(PasswordAliasConfigSource.java:101) at fish.payara.nucleus.microprofile.config.spi.ConfigExpressionResolver.getValue(ConfigExpressionResolver.java:117) at fish.payara.nucleus.microprofile.config.spi.ConfigExpressionResolver.resolve(ConfigExpressionResolver.java:101) at fish.payara.nucleus.microprofile.config.spi.ConfigExpressionResolver.resolve(ConfigExpressionResolver.java:83) at fish.payara.nucleus.microprofile.config.spi.PayaraConfig.searchConfigSources(PayaraConfig.java:322) at fish.payara.nucleus.microprofile.c …. msg.seeServerLog
Could be a bug or perhaps need more information. I recommend creating a post on our forum. https://forum.payara.fish/