Securing a Payara Server Cluster using NGINX
Security

In order to make a cluster of servers appear as one server, you need to introduce a load balancer. A load balancer will accept a request, and redirect it to one of the members of the cluster depending on a given configuration. A web server such as NGINX or Apache can act as this load balancer as well as a reverse proxy, which allows the web server to load balance requests across the cluster, act as a termination point for SSL connections to reduce strain on the cluster, as well as cache server content for quicker access. In this blog, we will set up NGINX as a reverse proxy and secure it using SSL.
See here for a guide on setting up a Payara Server cluster with Hazelcast.
Once you’ve got the cluster set up, start the cluster by going to ‘Standalone Instances’ and selecting all of the instances in the cluster to start, before clicking ‘Start’.

Next, we need to deploy an application to demonstrate our finished setup. For this, I will use an application called clusterjsp (downloadable from here). To deploy the application, go to ‘Applications‘, and search for ‘clusterjsp.war’ on your filesystem. Make sure that you select all the cluster instances as targets as shown below, as well as enabling ‘Availability’. Without this, the application won’t allow session replication.

You’ll now see your deployed app in the table on the Applications page.
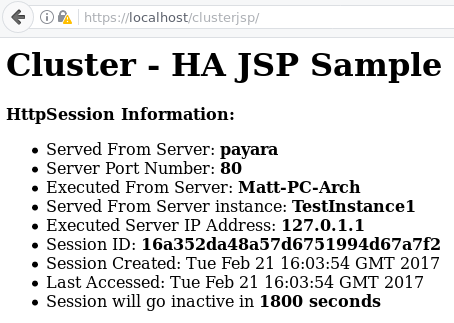
Click on the ‘Launch‘ link under ‘Actions‘. You should see twice the number of links as there are instances. This is because for each deployed application, the server is listening on both a secure and insecure port. The ports which (by default) end in ’81’ in are secure, and the ports which end in ’80’ in are insecure; we can also see that the secure links are https:// links. We will be using the insecure connection so that the web server can handle the SSL connections. This assumes that the connection between the web server and application server cannot be intercepted. Were this to be used in production you may wish to reconsider your architecture if you do not have a firewall between the web and application tiers, as it could prove to be a security weakness if the outside world can connect directly to the application tier host.
Open the insecure connections for both instances. If everything worked correctly, you should see that the session ID is the same on both of them even though they’re different instances.

Now we need to install NGINX to access them as one server. Assuming you’re using a Linux distribution, install NGINX from your distribution’s main repository.
So, for Ubuntu/Debian it would be: “sudo apt-get install nginx“. Find the install location, which should be at: /etc/nginx. If you find two directories named ‘sites-available‘ and ‘sites-enabled‘, then you’re in luck! Otherwise, you’ll have to create them.
sudo mkdir /etc/nginx/sites-enabled/
sudo mkdir /etc/nginx/sites-available/
If you’ve just created these directories, then you’ll also need to put a line in nginx.conf to get nginx to parse any configuration which is saved in the “sites-enabled” directory. after the line ‘http { ‘, and before the first include line, insert this line: ‘include /etc/nginx/sites-enabled/*;‘ (without the quotes). These two folders are for organising separate NGINX configuration files for each site that you want NGINX to host. The ‘sites-available‘ folder is for creating files to configure NGINX to handle requests for each service, and the ‘sites-enabled‘ folder is for creating links to files in ‘sites-available‘; this means that you can create files in ‘sites-available‘ but choose whether to deploy them with a symbolic link in ‘sites-enabled‘.
Create a new file in ‘sites-available‘ and call it something appropriate, like ‘payara.conf‘. Fill the file with the following:
upstream payara{
    least_conn;
    server localhost:28080 max_fails=3 fail_timeout=5s;
    server localhost:28081 max_fails=3 fail_timeout=5s;
}
server {
    listen        80;
    return        301 https://$host$request_uri;
}
server {
    listen        443 ssl;
    ssl_certificate        /etc/nginx/ssl/server.crt;
    ssl_certificate_key    /etc/nginx/ssl/server.key;

    ssl_protocols TLSv1 TLSv1.1 TLSv1.2;
    ssl_prefer_server_ciphers on;
    ssl_ciphers "EECDH+AESGCM:EDH+AESGCM:AES256+EECDH:AES256+EDH";

    location / {
        proxy_pass http://payara;
    }
}
There are 3 blocks here, one called ‘upstream payara’, and two called ‘server’:
We defined a few SSL certificate values there, namely ‘ssl_certificate‘ and ‘ssl_certificate_key‘. These are the SSL certificate and a generated private key respectively. This article will not go into how these work, just how to generate and sign them with openssl.
In a terminal window, enter the following command:
sudo openssl req -x509 -nodes -days 365 -newkey rsa:2048 -keyout /etc/nginx/ssl/server.key -out /etc/nginx/ssl/server.crt
This will create a private key and certificate pair. The certificate can be secured with a passphrase, but the -nodes modifier prevents this as it would require the passphrase to be entered each time the server starts.
Now the SSL information has all been generated, the next step is to add the full path to the certificate and key to our payara.conf file in sites-available, as shown in the example above.
Now that we have created our site configuration, all that’s needed is to link the created file to ‘sites-enabled’ and start NGINX!
In a terminal window, run the following command:
sudo ln -s /etc/nginx/sites-available/payara.conf /etc/nginx/sites-enabled/payara.conf
This will create a symbolic link in ‘sites-enabled’ for referencing with NGINX. Now run ‘sudo nginx‘, and NGINX should start successfully! If NGINX is already running, the configuration can be reloaded with ‘sudo nginx -s reload‘
To test this configuration, go to your browser and go to: “localhost/clusterjsp”. It should load the following page in Firefox, and similar in chrome or other browsers.

Go to Advanced → Add exception. Check the details of the certificate, it should match the certificate you just created.

Once the exception is added to your browser, the clusterjsp page should load, and you’ll notice the HTTPS lock in the top bar! Note the screenshot below still has a warning symbol next to it; that is because the certificate is still not trusted by the browser, we have just told the browser that we don’t mind about untrusted certificates when we visit localhost websites.
All done – you have now succesfully set up NGINX as a reverse proxy and secured it using SSL!
If you run your secure NGINX cluster in a production environment, you might want to make a few improvements to your NGINX configuration (found in /etc/nginx/nginx.conf). These are the following:
Forward request headers. This is useful to add transparency to the load balancer layer. This means that Payara Server receives the request headers sent by the user rather than the load balancer. By default, NGINX changes the “Host” and “Connection” headers, but a few are left unchanged. You can change these with the ‘proxy_set_header’ command below the ‘proxy_pass’. More information on request headers can be found here, but a sample configuration can be found below:
proxy_pass http://payara;
proxy_set_header Host $host;
proxy_set_header X-Real-IP $remote_addr;
proxy_set_header X-Forwarded-Host $host;
proxy_set_header X-Forwarded-Server $host;
proxy_set_header X-Forwarded-For $proxy_add_x_forwarded_for;
proxy_http_version 1.1;
proxy_request_buffering off;
proxy_set_header Connection "";
proxy_set_header X-Forwarded-Proto https;
Note: If you use X-Forwarded-Proto, then you’ll need to run the following asadmin command for it to work with Payara (for the correct http-listener):
asadmin>set server.network-config.protocols.protocol.http-listener-1.http.scheme-mapping=X-Forwarded-Proto
Use NGINX to cache your static content. NGINX is faster than Payara at serving static content, so caching things like images can speed up the page load time. To find out about caching static content, read this guide: https://www.nginx.com/blog/nginx-caching-guide/.
 4 minutes
Zero Trust security has moved from buzzword to necessity. The principle is simple: never trust, always verify. But implementing […]
 5 minutes
At Devoxx Belgium 2025, I was able to talk about what happens after you build your container. In theory, […]
 2 minutes
How outdated Java systems are draining budgets and throttling innovation across financial services? Let’s dig in in this blog […]

Hi Matthew,
great article, I really enjoyed reading it and it’s nice to see an alternative to the previous one for apache!
Some remarks from someone using this combo for quite some time now:
1st: don’t use the nginx from the distributions, instead get the stable version from here: https://nginx.org/en/linux_packages.html#stable
You can add these to your deb, apt, zypper or yum. This way you get the most current one and don’t rely on the aging one from your dist, especially since in the last year we got a big impact from new tech in http, where we are now by my….
2nd: don’t use regular http1.1, use http2!
Instead of
listen 443 ssl;
you do a:
listen 443 ssl http2;
where you….
3rd: need to get the ciphers right and not the one listed above as
using
ssl_ciphers “EECDH+AESGCM:EDH+AESGCM:AES256+EECDH:AES256+EDH”;
isn’t a good idea imho – head over to the mozilla labs under
https://wiki.mozilla.org/Security/Server_Side_TLS
and read the impact there, usually going for the intermediate compatibility as we dont want to lock out users since we are not yet a secret agency; With this knowledge we then head to the configurator under https://mozilla.github.io/server-side-tls/ssl-config-generator/ and let it spill out a good ssl config including DH and OCSP stapling. Also it is a good idea to not force SSL on your backend side as long as all is on a solo machine where we….
4th: don’t only do a
proxy_pass
but instead we wanna do at least a full suite of work:
proxy_set_header Host $host;
proxy_set_header X-Real-IP $remote_addr;
proxy_set_header X-Forwarded-Host $host;
proxy_set_header X-Forwarded-Server $host;
proxy_set_header X-Forwarded-For $proxy_add_x_forwarded_for;
proxy_http_version 1.1;
proxy_request_buffering off;
proxy_set_header Connection “”;
proxy_set_header X-Forwarded-Proto https;
So our payara then even can use this as SSL termination (you need to add the X-Forwarded-Proto to your listener in payara, though)
after that we only might finally think about…..
5th: usage of
proxy_buffers and a global cache in the nginx according to the caching values of the resources we have on our page, since nginx is way better to deliver images, css, js etc. than our payara in case those stay static.
Best,
KB
Hi Korbinian,
I’m glad you enjoyed reading it! Thank you for your comments, they’re extremely useful. Because of this I’ve included them in a new section at the bottom, which addresses the changes needed for a production environment. I hope it covers everything!
Kind regards,
Matt
Thank you for the post! Just a quick note: it is recommended to use Mainline repo of the Nginx (instead of Stable):
https://nginx.org/en/linux_packages.html#mainline
And the recommendation with explanation:
https://serverfault.com/questions/715049/what-s-the-difference-between-the-mainline-and-stable-branches-of-nginx
great guide on securing payara with nginx. when i’m testing my server configs from external networks, i sometimes use an online proxy browser to see how it appears from the outside.