Payara Micro JCA Adapters – Apache Kafka
Cloud & Microservices

In this blog, which follows on from the introduction to Cloud Connectors in Payara Micro, we’ll guide you through the process of setting up Payara Micro as a Kafka Client, which can produce and consume data from Apache Kafka.
Put simply, Apache Kafka is a publish-subscribe messaging system. It is similar to a traditional message broker (spoken about here), with a few differences. Kafka prioritises the message log over consumers, and because of this is optimised to process an extremely high volume of messages. This also means that it loses a few features associated with other message brokers. For example, there’s no web frontend built in, and performance monitoring is limited to JMX. If you want a message broker to process messages extremely quickly with low resource usage, Kafka is a good fit.
For this blog, I will be setting up a Kafka instance on one machine and communicating with it from a Payara Micro instance on another machine. I will be using two separate virtual machines, but for all intents and purposes you can assume that they are separate machines. This means that the setup will look like this:

One of the machines will need to have Apache Kafka installed and working. I will be using Ubuntu Desktop 16.04 LTS, so these steps may vary slightly if you are using anything else.
Firstly, you will want to make sure your system is up to date. I make no guarantees that every step will work perfectly without an up to date system!
sudo apt update
sudo apt upgrade
You will also need to have an installed JDK 8 for Kafka to work correctly.
sudo apt install openjdk-8-jdkAs Kafka uses ZooKeeper as its distributed storage system, you’ll need to have it installed to run Kafka. ZooKeeper is available from the Ubuntu default repository.
sudoaptinstallzookeeperd
When ZooKeeper is installed it should automatically start as a service on port 2181. To check this, run:
netstat -an | grep :2181You should see a result, as well as LISTEN on the right. If not, then start the server with:
sudosystemctl start zookeeper
Now you’ve installed all of the prerequisites, you can start with the install of Kafka. Download the latest version of Kafka from the website, or wget it with the following command:
wget http://apache.mirror.anlx.net/kafka/0.10.2.1/kafka_2.10-0.10.2.1.tgz
The next commands will make an install directory for Kafka, extract the downloaded archive there, and then start Kafka. Obviously if you downloaded a different version of Kafka or have a different installation directory then replace the relevant parts with your own.
sudo mkdir /opt/Kafka
sudo tar -xvf kafka_2.10-0.10.2.1.tgz -C /opt/Kafka
cd /opt/Kafka/kafka_2.10-0.10.2.1
sudo bin/kafka-server-start.sh config/server.properties
Note: to start the server in the background, run the last command through nohup (e.g. sudo nohup bin/kafka-server-start.sh config/server.properties >/dev/null 2>&1).
Assuming there were no errors, Kafka should now be installed and running; we just need to test this installation.
With Kafka running, open a new terminal. To make Kafka accessible from other machines on the network, you’ll need to know your IP address. If you don’t know your IP address, go to another terminal and type:
ip aYou’ll get an output like this:

Your IP address should appear similar to the highlighted section above. All of the following commands would work just fine by replacing every IP address with localhost but, since we’re working on two separate machines, we need to access them using their IP addresses.
Before using the server, we need to make a quick configuration change; find the file ${installation-directory}/config/server.properties and find the line: “#listeners=PLAINTEXT://:9092“. This needs to be uncommented (by removing the hash), and your IP address needs to be put after the double forward slash so, in my example, that’s: “listeners=PLAINTEXT://192.168.29.139:9092“.
Now you can move onto creating a topic to post test messages to. You can create a topic by running the following command from the Kafka install directory (so /opt/Kafka/kafka_2.10-0.10.2.1/in this example):
sudo bin/kafka-topics.sh --create --zookeeper 192.168.29.139:2181 --replication-factor 1 --partitions 1 --topic testing
Of course, the IP address will need to be replaced with the correct one for your environment. If everything worked correctly, you should see the message ‘Created topic “testing”.’, Which means the topic has been successfully created. You can now start posting to the new topic.
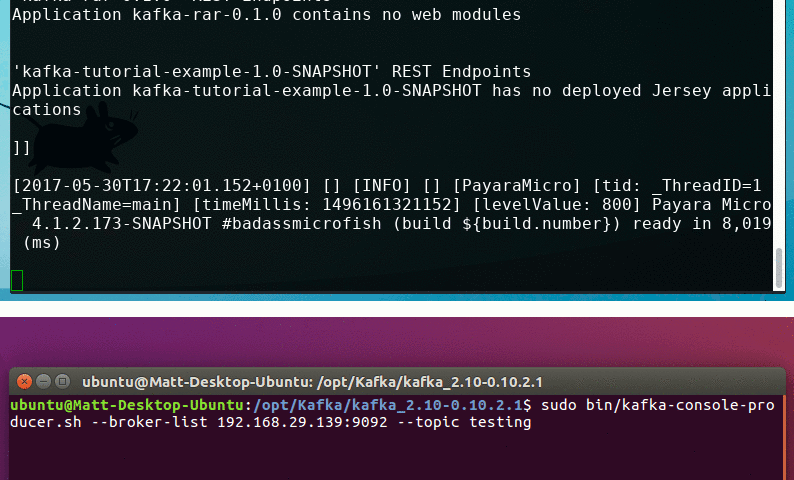
sudo bin/kafka-console-producer.sh --broker-list 192.168.29.139:9092 --topic testing
This opens an interactive interface to start posting messages to Kafka. You can enter any amount of messages as you want, and press enter after each one. Press CTRL+C to exit at any time.
We can view the messages we send using the equivalent consumer script; from a new terminal, go back to the same Kafka installation directory and run:
sudo bin/kafka-console-consumer.sh --bootstrap-server 192.168.29.139:9092 --topic testing --from-beginning
You should see the messages you typed appear in the terminal. The first time you do this, it’s worth giving the consumer 10 seconds or so to catch up.

Assuming you got a successful response, you’re now done setting up Kafka! If you don’t get this output, check that the IP addresses are correct everywhere, that ZooKeeper is running correctly, and that you don’t have any programs or network restrictions blocking connections.
On your second system, download the latest version of Payara Micro (currently 5.201). Once it’s downloaded, that’s pretty much it! You just need to make sure that you have a valid JDK (either 8 or 11) installed, the more recent the better. I’m using JDK 8, so I would recommend having at least the same major version installed.
{{cta(‘4129273b-d6b4-4ef3-8fb7-412a2d0dfdfb’)}}
For this tutorial, we’ll use the Kafka example project from the new Cloud-Connectors suite. You can find the project from GitHub here. Thankfully this artifact is also on Maven Central, so we can just declare it as a dependency in a separate project. This project should be installed on the same machine as Payara Micro, to communicate with Kafka. Firstly you need to create a basic Maven web project. There are guides on doing this online, or you can just create a basic one from a Maven archetype:
mvn archetype:generate -DarchetypeGroupId=org.codehaus.mojo.archetypes -DarchetypeArtifactId=webapp-javaee7 -DarchetypeVersion=1.1
Enter an appropriate group ID, artifact ID, version and package name for your web project. You want to end up with a project layout similar to the following:

Firstly, you need to add a few dependencies to your pom.xml. These are for importing the Kafka Connector API project, as well as the Connector itself.
<dependency>
    <groupId>fish.payara.cloud.connectors.kafka</groupId>
    <artifactId>kafka-rar</artifactId>
    <version>0.5.0</version>
    <type>rar</type>
</dependency>
<dependency>
    <groupId>fish.payara.cloud.connectors.kafka</groupId>
    <artifactId>kafka-jca-api</artifactId>
    <version>0.5.0</version>
    <scope>provided</scope>
</dependency>
You also need to configure the maven-dependency-plugin. This is because RAR adapter connectors can’t be included in WAR files, so it needs to be copied across and deployed separately alongside the application.
<plugin>
    <groupId>org.apache.maven.plugins</groupId>
    <artifactId>maven-dependency-plugin</artifactId>
    <version>3.1.0</version>
    <executions>
        <execution>
            <id>copy-dependencies</id>
            <phase>package</phase>
            <goals>
                <goal>copy-dependencies</goal>
            </goals>
        </execution>
    </executions>
</plugin>
Now you just need to add a class to the created package. I’ve named the class KafkaMDB.
@MessageDriven(activationConfig = {
    @ActivationConfigProperty(propertyName = "clientId", propertyValue = "testClient"),
    @ActivationConfigProperty(propertyName = "groupIdConfig", propertyValue = "test-consumer-group"),
    @ActivationConfigProperty(propertyName = "topics", propertyValue = "testing"),
    @ActivationConfigProperty(propertyName = "bootstrapServersConfig", propertyValue = "192.168.29.139:9092"),
    @ActivationConfigProperty(propertyName = "autoCommitInterval", propertyValue = "100"),
    @ActivationConfigProperty(propertyName = "retryBackoff", propertyValue = "1000"),
    @ActivationConfigProperty(propertyName = "keyDeserializer", propertyValue = "org.apache.kafka.common.serialization.StringDeserializer"),
    @ActivationConfigProperty(propertyName = "valueDeserializer", propertyValue = "org.apache.kafka.common.serialization.StringDeserializer"),
    @ActivationConfigProperty(propertyName = "pollInterval", propertyValue = "1000"),
})
public class KafkaMDB implements KafkaListener {

    @OnRecord( topics={"testing"})
    public void getMessageTest(ConsumerRecord record) {
        System.out.println("Got record on topic testing " + record);
    }
}
This is an MDB (Message Driven Bean) that implements the KafkaListener interface, and describes how to listen to a message broker and react to messages sent from it. There are a few things to note about this file:
Once you’ve made these changes, you should be ready to go! Just build this project using mvn package and you’re ready to deploy to Payara Micro.
You need the following three files to make this work:
The latter two should be in the directory tree shown below (if you can’t find these files then you may not have built the projects with "mvn package“).

To deploy these to Payara Micro, run the following command.
java -jar payara-micro.jar --deploy target/dependency/kafka-rar-0.5.0.rar --deploy target/kafka-tutorial-example-1.0-SNAPSHOT.war
Note: You must deploy the RAR file first, as the example WAR depends on the resource adapter to load properly.
If everything worked correctly, you should get output similar to below.
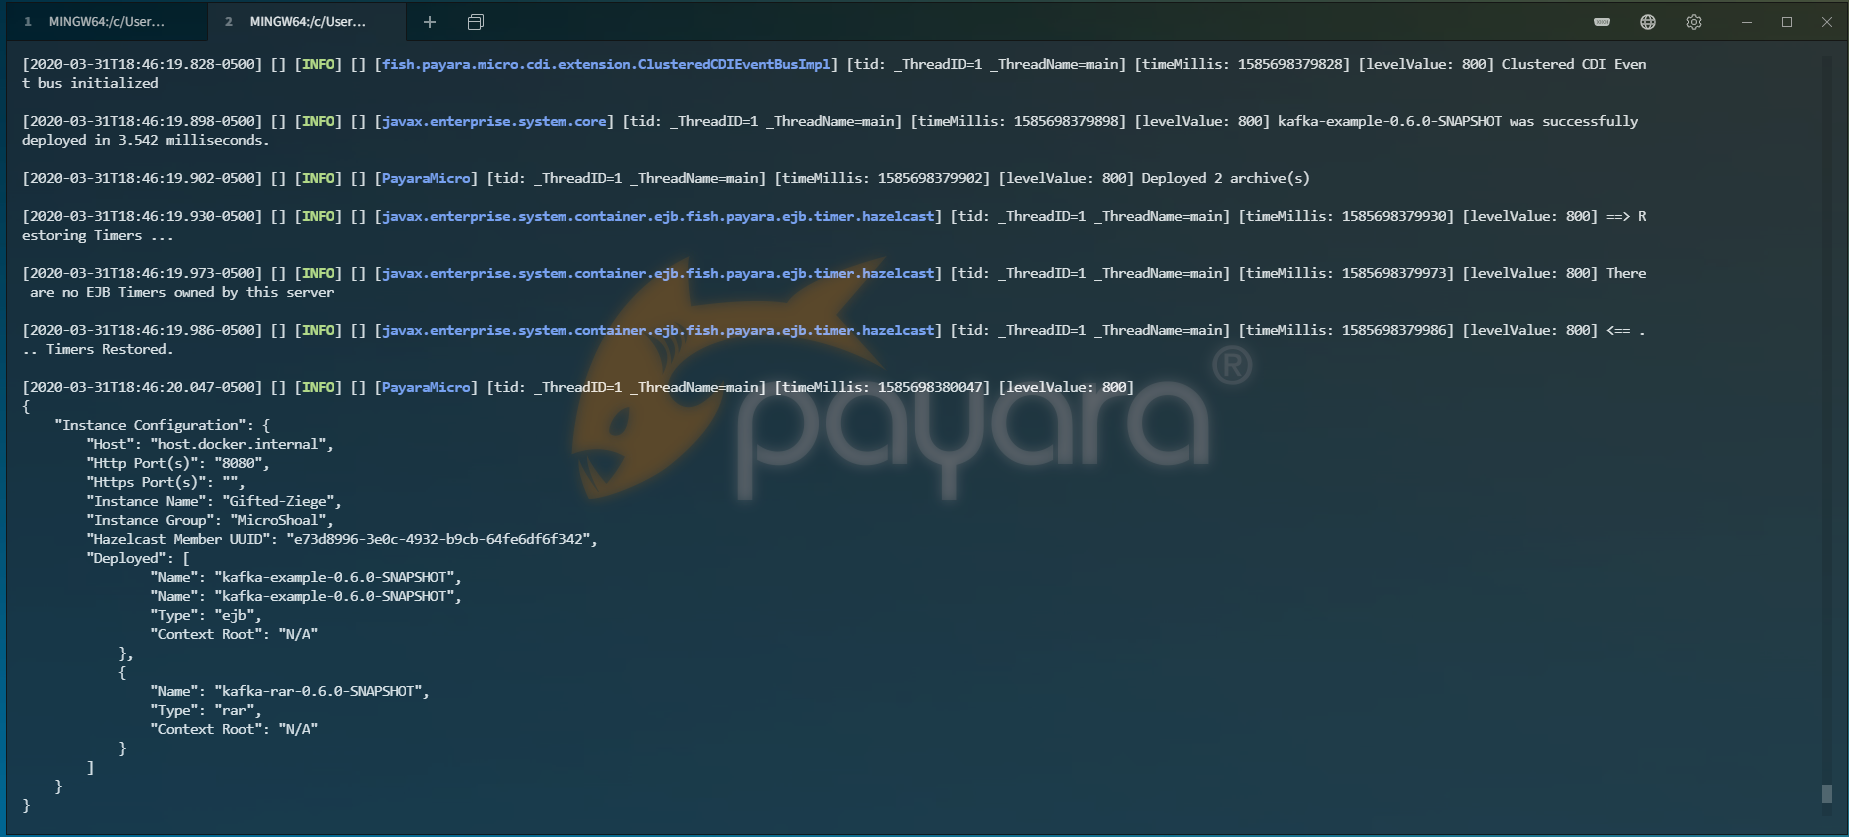
Now all you need to do is type a command into the Kafka input window on the other machine, and you should see the message printed out in Payara Micro!
Now that you are able to receive messages from Kafka, it would be nice to be able to send them too! This can be added to the example project using a ConnectionFactory. The JCA API we have as a Maven dependency also has a Kafka specific connection factory. You just need to declare the connection pool and inject it as an instance of this class to use it. I’ve made a class called KafkaMessenger, the code of which is shown below.
@ConnectionFactoryDefinition(name = "java:module/env/KafkaConnectionFactory",
        description = "Kafka Connection Factory",
        interfaceName = "fish.payara.cloud.connectors.kafka.KafkaConnectionFactory",
        resourceAdapter = "kafka-rar-0.5.0",
        minPoolSize = 2,
        maxPoolSize = 2,
        transactionSupport = TransactionSupport.TransactionSupportLevel.NoTransaction,
        properties = {
            "bootstrapServersConfig=192.168.29.139:9092",
            "clientId=PayaraMicroMessenger"
        })
@Stateless
public class KafkaMessenger {

    @Resource(lookup = "java:module/env/KafkaConnectionFactory")
    KafkaConnectionFactory factory;

    @Schedule(hour = "*", minute = "*", second = "*/5", persistent = false)
    public void sendMessage() {
        try (KafkaConnection conn = factory.createConnection()) {
            conn.send(new ProducerRecord("testing", "Sent from Payara Micro."));
        } catch (Exception ex) {
            Logger.getLogger(getClass().getName()).log(Level.SEVERE, null, ex);
        }
    }
}
The top-most annotation @ConnectionFactoryDefinition declares a connection factory programmatically. This can also be configured from the admin console on Payara Server, but by defining it programmatically you ensure that this connection factory is only available to the application it’s defined in, so you won’t be able to access it from other applications. This block defines all the required values for the connection factory to work.
TransactionSupport.TransactionSupportLevel. This defines the level of transactionality that the connection factory has.bootstrapServersConfig property, to define the Kafka host.The connection factory created above is injected using the JNDI name specified earlier. It is injected using the interface defined in the API. This is now usable as a connection factory.
The class is annotated with stateless, which is just because the class needs to be an EJB to use an EJB timer. The EJB timer has a scheduled event every 5 seconds called sendMessage(). This will use the created connection factory to send a new record to the topic “testing”, which is “Sent from Payara Micro.”.
Compiling and running the project in the same way as before should give the same result, except the events will start coming in automatically, as they’re also being fired from Payara Micro.
Hopefully this blog has given some sort of an insight into the power of Kafka as well as the JCA connectors now in Payara Micro. This is a useful feature that can help enhance programs in a micro services architecture by providing a technology agnostic messaging system.
{{cta(‘fe0f40a0-5c80-4d29-adb6-ab87c04970d1’)}}
 4 minutes
The March 2026 release brings important platform modernization, stability improvements, and comprehensive bug fixes across the Azul Payara Platform […]
 7 minutes
If you worked with MicroProfile Health, you already understand the value of exposing application health information through standardized endpoints. […]
 1 minute
Modern high-frequency trading (HFT) platforms operate under extreme performance constraints, processing tens of thousands of messages per second while […]

Is this kafka JCA adapter usable only in payara server? I am trying to use in a jboss EAP server and when the server tries to deploy the RAR file i get errors that ResourceAdapter and ConnectionFactory must implement “public int hashCode()” and “public int equals()”. Can I fix this somehow?
Hi Radostin,
The JCA Adapters are all intended for use with the Payara Platform. They may work with other application servers with some tweaks, but we make no guarantee of out-of-the-box interoperability.
Kind regards,
Matt
I compiled and installed KafkaAR.rar inside JBOSS EAP, but it doesn’t work and I get the following error.
The ra.xml file is missing from the project and I ask you for help in carrying out some tests
Hi Radostin,
If the only error you receive however is related to the hashcode() and equals() methods, version 0.3.0 of the cloud connectors should include these methods. I’ll make sure the blog gets updated to use the new version!
Kind regards,
Matt
I am trying to do something similar but wildfly 18, kafka 2.4.0. I followed the tutorial in http://www.mastertheboss.com/jboss-frameworks/apache-kafka/getting-started-with-apache-kafka-and-wildfly
In the above example, in the section “Creating a Kafka Producer” and class “KafkaQueueResource” , @Resource annotation seems to be injecting wrong type, KafkaConnectionFactoryImpl instead of KafkaManagedConnectionFactory.
I wonder if I could possibly use KafkaManagedConnectionFactory instead of KafkaConnectionFactoryImpl.
while trying to deploy the application I get an EJB container initialization error with the below message:
Exception while loading the app : EJB Container initialization error
java.lang.Exception
at com.sun.enterprise.connectors.inbound.ConnectorMessageBeanClient.setup(ConnectorMessageBeanClient.java:215)
at org.glassfish.ejb.mdb.MessageBeanContainer.(MessageBeanContainer.java:221)
at org.glassfish.ejb.mdb.MessageBeanContainerFactory.createContainer(MessageBeanContainerFactory.java:63)
at org.glassfish.ejb.startup.EjbApplication.loadContainers(EjbApplication.java:225)
at org.glassfish.ejb.startup.EjbDeployer.load(EjbDeployer.java:286)
Caused by: org.apache.kafka.common.KafkaException: class org.apache.kafka.common.serialization.StringDeserializer is not an instance of org.apache.kafka.common.serialization.Deserializer
Anyone facing a similar issue ? or knows how to fix it ?
Hi Kruti,
This looks like an error that could relate to some of your dependencies, or one of your application classes needing to implement Deserializer. Try the following link for help: https://stackoverflow.com/questions/48864032/apache-kafka-stringdeserializer-is-not-an-instance-of-deserializer. If you still experience issues, please raise an issue on our GitHub where someone may be able to help.
Best regards,
Matthew
HI Matthew, Thanks for the reference however, the reference you provided has a mention of forcing the classloader to null for the current-thread. However in my case i am implementing the consumer MDB and its initialization fails, hence i don’t reach the point in code where i can access the tread and set the class-loding preferences.
Dear Kruti I’m facing the same problem. Did you manage to solve your deployment problem?
HI Matthew, i just try to use adapter to read messages from Kafka on Wildfly. In default useSynchMode=”false” parameter, adapter don’t work. MDB did not receve any message. What could be the problem?
Payara’s official stance on this is that we support the JCA adapters only when used with Payara Platform. They might work with other runtimes but if they don’t work, we would accept a fix from the community but we won’t fix it ourselves. So we’d suggest trying our his scenario with Payara Server and if it doesn’t work, then report it as a github issue on the https://github.com/payara/ecosystem-support/ issue tracker. You can also pose your question to the community https://forum.payara.fish/