How to Use OpenIdConnect with Payara Platform to Achieve Single Sign-on
Payara
When a user needs to access multiple applications in your environment, you should not require authentication for each application. If the user has already been authenticated for one of the applications, he or she should should not be asked for credentials when he accesses one of the other applications during the same browser session. This concept is called Single Sign-on where the authentication credentials are ‘shared’ in the environment and can be used by any application in that environment.
The Single Sign-on principle became more important in the last few years as the idea of microservices is also applied to the front end – and thus your big application is now a set of smaller, connected apps. When you are using Micro Frontends or Self-Contained Systems, you should consider implementing a Single Sign-on strategy.
In this blog, I describe how you can use the OpenIdConnect (OIDC) support within the Payara Platform products to achieve a Single Sign-on. This can be used when the applications are running on different servers or even on a mixture of Payara Server and Payara Micro. It requires a third-party product, the OIDC provider, which is responsible for the authorization of the user. In this example, I’m using Google, but there are many providers supported by the Payara Platform.
If all the applications are deployed on the same Payara Server domain, you can use the Single Sign-on support based on the Payara Realms. Have a look at the How to Use Single Sign-on with Payara Server Realms blog post to learn more about this approach.
The Payara Platform products easily integrate with any product that supports the OpenIdConnect protocol.
Explaining OAuth2 and OIDC is not in the scope of this blog as it would require too much space, but I’ll give a very high-level introduction. You can also learn more in our user guide, Secure Your Applications with Authentication and Authorization.
{{cta(‘1e4c6b99-f75d-431c-827a-3e939e6af8e6’)}}
OAuth2 handles the authorization and is similar to the SAML protocol but uses JSON instead of XML. With OAuth2, the application doesn’t know anything when it inspects the token. It can use it only to perform some actions against the provider who has created the token.
OIDC is built on top of this, where the created token is an idToken describing the user. It contains information about the user identity and roles and permissions it has (known by the OIDC provider). This specification is more about the authentication of the user and is not opaque, but contains the information which can be used by your application (after the signature is verified to make sure it is a valid token produced by the OIDC provider).
The configuration can be easily achieved by using the following annotations on any CDI bean:
@GoogleAuthenticationDefinition()
This annotation defines Google as the OIDC Provider. (we have also support for the other major providers or you can use the generic @OpenIdAuthenticationDefinition which requires additional configuration like the OIDC endpoints of the provider).
These annotations are available in the payara-api artefact, so this needs to be added to the project, like a Maven build file:
<dependency>
   <groupId>fish.payara.api</groupId>
   <artifactId>payara-api</artifactId>
   <version>5.2021.1</version>
   <scope>provided</scope>
</dependency>
Two configuration parameters are required and define your OIDC configuration of the application in the Google Console. The ClientId and the ClientSecret can be defined as properties of the annotations but this is of course not secure and not recommended as you cannot change it easily between your different environments like development, test, and production.
Since we have integrated the MicroProfile Config support into this feature, you can use one of the more than 15 available sources where you can define the value for ClientId and ClientSecret. For more information on the MicroProfile Config support with Payara, have a look at the following documentation page.
When defined within a properties file, it can look like this:
payara.security.openid.clientId=8853612...
payara.security.openid.clientSecret=AD_uql....
If the OIDC provider supports the maintenance of the user groups, this information can directly be extracted from the exchanged tokens between the OIDC provider and Payara. By default, it is read from the groups claim, but this can be configured using the annotation:
@OpenIdAuthenticationDefinition(
        claimsDefinition = @ClaimsDefinition(callerGroupsClaim = "user-groups")
)
Google, however, doesn’t support this, which means we have to provide the groups of the authenticated users ourself. Otherwise, the user will not have any roles and that is not very useful for our application.
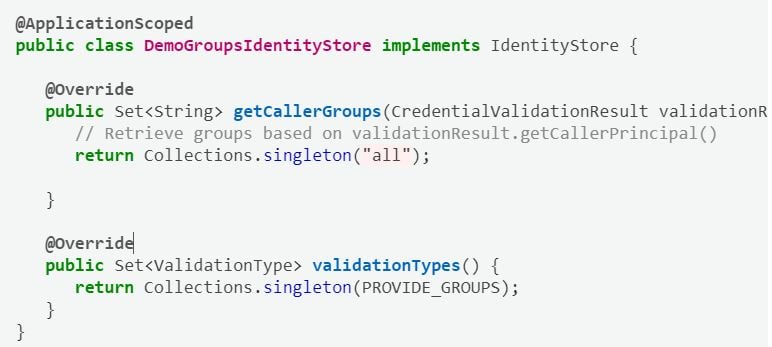
These groups can be provided using the IdentityStore concept of the Jakarta Security API as the OIDC support within Payara is built on top of this API. When creating a custom IdentityStore, you can retrieve the groups from any system you prefer, including a database.
@ApplicationScoped
public class DemoGroupsIdentityStore implements IdentityStore {

   @Override
   public Set<String> getCallerGroups(CredentialValidationResult validationResult) {
      // Retrieve groups based on validationResult.getCallerPrincipal()
      return Collections.singleton("all");

   }

   @Override
   public Set<ValidationType> validationTypes() {
      return Collections.singleton(PROVIDE_GROUPS);
   }
}
The mapping from Groups to Roles is done automatically on a one-to-one basis (the group name becomes the role name) or can explicitly be defined in the payara-web.xml description file using the <security-role-mapping> tag.
Now that we have defined the OIDC provider integration, we can use this security information to protect access to the application. This can be achieved using the web.xml file with the <security-constraint> tag to define the required roles for the resource and <security-role> tag to provide all possible roles to the system.
Or this information can be specified using annotations:
@DeclareRoles("all")
to specify all possible roles and this annotation can be placed on any CDI bean. And on a servlet, the @ServletSecurity can be used for example to indicate the required role before it can be executed:
@ServletSecurity(@HttpConstraint(rolesAllowed = "all"))
So far we have only described how to integrate the OIDC support within your application. This is because the OpenIdConnect protocol by default supports Single Sign-On. You don’t need to do anything specific to have the functionality.
If you use the same ClientId and ClientSecret in multiple applications, the Single Sign-on functionality is provided by the OIDC Provider. If it detects that the user is already authenticated with the provider, it immediately calls the Callback method in your application with the necessary tokens. You only need to make sure the different applications are all registered in that same OIDC application so that the provider doesn’t reject the authentication request.
The Callback method needs to be implemented by the developer but the entire handling of the tokens is already taken care of. You only need to decide what needs to happen after the user is authenticated. The following example redirects the user to the original secured page that triggered the authentication flow with the OIDC Provider:
@WebServlet("/Callback")
public class Callback extends HttpServlet {

    @Inject
    private OpenIdContext context;

    @Override
    protected void doGet(HttpServletRequest request, HttpServletResponse response) throws ServletException, IOException {

        response.sendRedirect(request.getSession().getAttribute(OpenIdConstant.ORIGINAL_REQUEST).toString());
    }

}
At any point in your application, you can inject the OpenIdContext to retrieve all the security-related information of the user.
Single Logout is not supported by default by all providers. When you log out of an application, the provider might not contact all the other applications using the same OIDC session to inform about this logout action. The Single Logout can be activated by setting the property notifyProvider to true, and you can define a specific page the user will be sent to after he has been logged out of the application and the OIDC session.
@OpenIdAuthenticationDefinition(
   logout = @LogoutDefinition(notifyProvider = true, redirectURI = "/local-logout.html")
)
As Single Sign-On is by default supported by the OpenIdConect protocol, all applications using the same ClientId and ClientSecret will join the same Single Sign-On group. When already logged in, no authentication will be requested and the other application can be accessed immediately. The applications don’t need to be deployed in the same environment, it will work as long as each application is correctly configured at the OIDC provider.
Single Sign-On can easily be achieved since the integration of the OpenIdConnect protocol is very simple with the Payara products, you just need a single annotation and two configuration values.
When you do not want to use a provider and all applications are deployed on the same Payara Server Domain, you can have a look at the Payara Single Sign-on option based on a Payara realm described in the How to Use Single Sign-on With Payara Server Realms blog.
Share:

 1 minute
Earlier this week, we’ve launched the 2026 Payara Platform Community Survey and we’d love to hear from you. If […]
 4 minutes
Zero Trust security has moved from buzzword to necessity. The principle is simple: never trust, always verify. But implementing […]
 4 minutes
Strategic acquisition bolsters Azul’s Java platform with complementary products, deep Java expertise and accelerated go-to-market capabilities SUNNYVALE, Calif., and MALVERN, […]
Nice article! One question;
1) How do I secure multiple servlets (or resources) belonging to a single application using the Azure provider?
I am using the annotation “AzureAuthenticationDefinition” to secure one API/Servlet belonging to my JEE web application. Using this annotation with a servlet (.i.e. http://localhost:8443/MyApp/WebApiA) works fine. But how do I secure the second servlet (.i.e. http://localhost:8443/MyApp/WebApiB). Using the said annotation twice breaks the application. Unfortunately I did not find any example which would give me a hint. Can you please help me? Thanks!
Hi Kevin,
The authentication information should only be defined once in an application, and only the authorization info needs to be indicated on the endpoints.
So in the case you mention, the second servlet WebApiB should have only the annotation @ServletSecurity(@HttpConstraint(rolesAllowed = “all”)) or whatever is appropriate in your case.
The Jakarta Security API doesn’t allow to define multiple authentication mechanisms (and thus also not repeating the AzureAuthenticationDefinition)
Best regards
Rudy
Hi Rudy,
what I still did not understand regarding the @OpenIdAuthenticationDefinition annotation is: Is it necessary to add the annotation to any CDI/EJB that is using the javax.annotation.security API such as DeclareRoles or RolesAllowed or ctx.isCallerInRole(..)?
I have a third party library (imixs-workflow) which is using the DeclareRoles/RolesAllowed on a lot of EJBs. I can’t change the code base just to support OIDC.
So when I have an application with a lot of JSF/CDI and Backend EJBs using the Jakarta EE Security API, where should I implement @OpenIdAuthenticationDefinition?
Is it sufficient to write one single ApplicationScoped login controller CDI bean? Something like this:
@ApplicationScoped
@Startup
@DeclareRoles({ “MANAGERACCESS” })
@RunAs(“MANAGERACCESS”)
@OpenIdAuthenticationDefinition(
providerURI = “https://sample-openid-server.com”,
clientId = “xxx”,
clientSecret = “{my-secret}”,
redirectURI = “${baseURL}/callback”,
extraParameters = {
“testKey=testValue”,
“testKey2=testValue2”
}
)
public class LoginBean {
@PostConstruct
public void init() {
out.println(context.getCallerName());
out.println(context.getCallerGroups());
}
}
Best regards
Ralph
Thanks for the comment, I would recommend posting your question to our Forum where you may be able to get more help. https://forum.payara.fish/
So if Jakarta Security API doesn’t allow multiple authentication mechanisms. There is no option to use Payara OpenIdConnect with an alternative login (like own database)?
It’s fairly common these days to have google/facebook and custom internal authentication on pages. Would such option require a custom implementation of HttpAuthenticationMechanism?
Hello,
I can login using Keycloak as OIDC provider (I see the session created) but the web application J2EE 8 is not really logged on correclty because the UserPrincipal is not set.
Have you ever experience the below errors after the login OIDC process ?
I read these messages through the fish.payara.security logger.
Redirecting for authentication to http://10.5.1.35:9900/auth/realms/my-realm/protocol/openid-connect/auth?scope=openid&response_type=code&client_id=my-client.apps.keycloak.com&redirect_uri=http%3A%2F%2F192.168.1.11%3A8080%2Fsvc%2Flogin%2Foidc_callback&state=549cefdd-ac37-45ab-958b-82197897cb2d&nonce=4NIhtZqVUZT2FzBLDOw4AmSRBVJ1P5NV4AoojAsqFKI&display=page|#]
UserPrincipal is not set, authenticate user using OpenId Connect protocol.|#]
Expected state not found|#]
Is there a way to use the extraParametersExpression annotation parameter to load this from the config file or a CDI Config Bean?
I managed to provide params like the clientSecret form a CDI config bean, but trying to provide the extraParameters from a CDI bean I failed. Also in the final specification there is now extraParameters and extraParametersExpression. What is the different between this?
Thanks for the comment, I would recommend posting your question to our Forum where you may be able to get more help. https://forum.payara.fish/