ForgeRock Integration with Payara Server – Part 2: Access, Deploy & Test
Uncategorized
Click here to see part 1 (Installation)
Now that the ForgeRock tools have been installed, we will configure them with some basic access configuration. First, proceed to login to the OpenAM application (context /openam) with the amadmin user, and the application will show you the current realm configuration for your domain:

A realm is generally used to group configuration and identities together. For example, you might have one realm for OpenAM administrators and agents, and another realm for the business users for your applications. In this two-realm setup, the OpenAM administrator can log in to the administrative realm to manage the services, but cannot authenticate as administrator to the realm that protects web applications that handle financial information for example.
In this real word scenario, we are going to create a sub-realm to allow identification services for “business” users only. Click on the New Realm button and provide the following parameters:

Now, access this new realm, and select the Subjects option in the top menu. A subject refers to all user and group identities that are used to grant access to protected resources:

For this scenario, we are going to create 3 users: Alice Lamarck, Bob Richards and Carl Emmerson. Click on the New button and provide the id (in username format), names and passwords:

Having created these users, we’ll now proceed to create a new security policy to protect the web applications that we will deploy on the Payara Server domain: app1 and app2, and then grant Alice access to app1, Bob access to app2 and Carl to both applications.
First, we select the option Policy Sets (under Authorization) on the dashboard, and the application will prompt us to add a new resource type:

Now, add a new resource type with the following parameters:
Resource types define a template for the resources that policies apply to, and the actions that could be performed on those resources. The URL resource type that was defined acts as a template for protecting web pages or applications. It contains resource patterns, such as *://*:*/*?*, which can be made more specific when used in the policy and its constrained by a set of actions (HTTP verbs) as well.
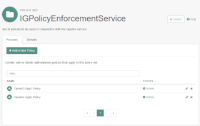
Now, create a new Policy Set called IGPolicyEnforcementService linking it to the resource type we created:

And within this policy set, we will create a policy for each application. First, we create the policy for application app1, with the following data:

Take into account that for the resources you must point to the port of the Apache Tomcat server instead of the Payara Server, since in this location it’s where the OpenIG is deployed and will intercept the requests for the application and will delegate to the OpenAM the authentication and authorization process. Once created, add the GET and POST actions to the policy and add Alice and Carl to the list of authenticated users that are allowed to access the protected resources:


Also, we need to tell the policy to “inject” some specific user information in order to let the applications deployed in Payara to identify the “logged” user once they successfully pass the OpenAM authentication phase. In order to do this, we add the subject attributes CN and UID in the Response attributes tab:

Repeat the process creating a new policy for application app2, and grant access to Bob instead of Alice (remember to add Carl as well). The policy set will now be completed:

For OpenIG to request policy decisions when delegating authentication and authorization, it must use the credentials of an authenticated user with the privilege to do so. We need to create a new user called Gateway Policy Enforcer in the Business Realm:

Also, we need to create a new group called Policy Administrator and add this new user to it:

And finally grant a privilege to this group to allow REST calls for policy evaluation (select the Privileges option in the menu and then select the group):

After following these instructions, OpenAM is already configured with access rules for our 2 applications and our 3 test users. Next we need to configure OpenIG!
OpenIG works by using specific “route” declarations that handle all operations to be done on all HTTP traffic intercepted by it. First, we will create a JSON configuration file in the following path:
$HOME/.openig/config/routes/
OpenIG will read all “route” files present in this folder and actively modify its routing configuration without the need to restart the server. In this case, this file will handle all routing configuration for our applications deployed on the Payara Server domain.
First, we create the file:
mkdir -p ~/.openig/config/routes/

touch ~/.openig/config/routes/00-app-config.json
And now, we proceed to write the following JSON object to it:
 {
    "name": "test-app-routes",
    "handler": "AppDispatcher",
    "heap": [
         {
           "name": "AppDispatcher",
           "type": "DispatchHandler",
           "config": {
             "bindings": [
               {
                  "condition": "${request.cookies['iPlanetDirectoryPro'] == null}",
                  "handler": "OpenAMLoginHandler"
               },
               {
                 "condition": "${request.cookies['iPlanetDirectoryPro'] != null}",
                 "handler":{
                    "type": "Chain",
                    "config":{
                        "filters":[
                            "OpenAMPolicyEnforcementFilter", "UserDataFilter"
                        ],
                        "handler": "AppHandler"
                    }
                 }
               }
             ]
           }
         },
         {
            "name": "OpenAMLoginHandler",
            "type": "StaticResponseHandler",
            "config": {
              "status": 302,
              "headers": {
                "Location": [
                  "http://forgerock-test.fturizo.com:8084/openam/XUI/#login/&goto=${urlEncode(contexts.router.originalUri)}"
                ]
              },
              "entity": "Redirecting to OpenAM..."
            }
         },
         {
            "name": "OpenAMPolicyEnforcementFilter",
            "type": "PolicyEnforcementFilter",
            "config": {
              "openamUrl": "http://forgerock-test.fturizo.com:8084/openam/",
              "pepUsername": "policyEnforcer",
              "pepPassword": "*******",
              "realm": "business",
              "application": "IGPolicyEnforcementService",
              "ssoTokenSubject": "${request.cookies['iPlanetDirectoryPro'][0].value}",
              "policiesHandler": "UserAttributesHandler"
            }
         },
         {
            "name": "UserAttributesHandler",
            "type": "Chain",
            "config":{
                "filters":[
                    "PolicyEvaluationUserFilter"
                ],
                "handler": "ClientHandler"
            }
         },
         {
             "name": "PolicyEvaluationUserFilter",
             "type": "EntityExtractFilter",
             "config":{
                 "messageType": "response",
                 "target": "${session.userInfo}",
                 "bindings": [
                   {
                       "key": "id",
                       "pattern": ""uid":["(w*)"]",
                       "template": "$1"
                   },
                   {
                       "key": "fullName",
                       "pattern": ""cn":["((w|s)*)"]",
                       "template": "$1"
                   }
                 ]
             }
         },
         {
             "name": "UserDataFilter",
             "type": "AssignmentFilter",
             "config":{
                 "onRequest": [
                   {
                     "target": "${request.headers['username']}",
                     "value": "${session.userInfo.id}"
                   },
                   {
                     "target": "${request.headers['fullName']}",
                     "value": "${session.userInfo.fullName}"
                   }
                 ]
             }
         },
         {
           "name": "AppHandler",
           "type": "ClientHandler",
           "baseURI": "http://business.fturizo.com:8080/"
         }
    ],
    "condition": "${matches(request.uri.path, '^/forgerock-test')}"
}
Now, we will dissect this configuration object to understand how the routing works:
"condition": "${matches(request.uri.path, '^/forgerock-test')}"
          {
           "name": "AppDispatcher",
           "type": "DispatchHandler",
           "config": {
             "bindings": [
               {
                  "condition": "${request.cookies['iPlanetDirectoryPro'] == null}",
                  "handler": "OpenAMLoginHandler"
               },
               {
                 "condition": "${request.cookies['iPlanetDirectoryPro'] != null}",
                 "handler":{
                    "type": "Chain",
                    "config":{
                        "filters":[
                            "OpenAMPolicyEnforcementFilter", "UserDataFilter"
                        ],
                        "handler": "AppHandler"
                    }
                 }
               }
             ]
           }
         }
This object is defined as a DispatchHandler that routes HTTP requests depending on certain conditions. For this scenario, there are only 2 options:
        {
            "name": "OpenAMLoginHandler",
            "type": "StaticResponseHandler",
            "config": {
              "status": 302,
              "headers": {
                "Location": [
                  "http://forgerock-test.fturizo.com:8084/openam/XUI/#login/&goto=${urlEncode(contexts.router.originalUri)}"
                ]
              },
              "entity": "Redirecting to OpenAM..."
            }
         }
For the Location header, replace the URL of the OpenAM login URL appropriately. Once the user logs in successfully, OpenAM will redirect him to the original URL (defined in the goto query parameter).
         {
            "name": "OpenAMPolicyEnforcementFilter",
            "type": "PolicyEnforcementFilter",
            "config": {
              "openamUrl": "http://forgerock-test.fturizo.com:8084/openam/",
              "pepUsername": "policyEnforcer",
              "pepPassword": "*******",
              "realm": "business",
              "application": "IGPolicyEnforcementService",
              "ssoTokenSubject": "${request.cookies['iPlanetDirectoryPro'][0].value}",
              "policiesHandler": "UserAttributesHandler"
            }
         }
This filter takes the request and calls an OpenAM REST endpoint that evaluates is the current authenticated user has access to the requested resource. If the user has access, the filter chain is continued, if not, OpenIG will issue an HTTP 401 – Unauthorized response back to the client. Replace the OpenAM URL appropriately and assign the credentials for the policyEnforcer user we created earlier.
{
            "name": "UserAttributesHandler",
            "type": "Chain",
            "config":{
                "filters":[
                    "PolicyEvaluationUserFilter"
                ],
                "handler": "ClientHandler"
            }
        }
As you can see, this handler is defined as a Chain object that uses the following filter:
{
             "name": "PolicyEvaluationUserFilter",
             "type": "EntityExtractFilter",
             "config":{
                 "messageType": "response",
                 "target": "${session.userInfo}",
                 "bindings": [
                   {
                       "key": "id",
                       "pattern": ""uid":["(w*)"]",
                       "template": "$1"
                   },
                   {
                       "key": "fullName",
                       "pattern": ""cn":["((w|s)*)"]",
                       "template": "$1"
                   }
                 ]
             }
         }
The PolicyEvaluationUserFilter object is used to extract the values for this 2 attributes from the JSON object in the response entity using regular expressions and assigning these values to the userInfo in the session object (A special object used to hold values for the duration of the route handling).
         {
             "name": "UserDataFilter",
             "type": "AssignmentFilter",
             "config”: {
                 "onRequest": [
                   {
                     "target": "${request.headers['username']}",
                     "value": "${session.userInfo.id}"
                   },
                   {
                     "target": "${request.headers['fullName']}",
                     "value": "${session.userInfo.fullName}"
                   }
                 ]
             }
         }
{
           "name": "AppHandler",
           "type": "ClientHandler",
           "baseURI": "http://business.fturizo.com:8080/"
         }
The baseURI decorator rewrites the destination of the request and “hands” it to an external service. Replace it with the correct URL of the Payara Server domain.
Now, we proceed to create 2 simple web applications. Each application must be set up with the JSF servlet mapped to the *.xhtml pattern. Now for each application, we will create a single index.html page with the following content:
<?xml version='1.0' encoding='UTF-8' ?>
<!DOCTYPE html>
<html xmlns="http://www.w3.org/1999/xhtml"
      xmlns:h="http://xmlns.jcp.org/jsf/html"
      xmlns:c="http://xmlns.jcp.org/jsp/jstl/core">
    <h:head>
        <title>ForgeRock Test Application ###</title>
    </h:head>
    <h:body>
        <h1>Welcome to test application ###! You have access!</h1>
        <h2>Request header contents:</h2>
        <dl>
            <c:forEach items="#{headerValues}" var="entry">
                <dt>#{entry.key}</dt>
                <c:forEach items="#{entry.value}" var="headerValue">
                    <dd>#{headerValue}</dd>
                </c:forEach>
            </c:forEach>
        </dl>
    </h:body>
</html>
The goal of this simple page is to identify the application that we are accessing and to print the header contents of the HTTP request that gets to the server. Since the user information is being injected in the request headers, this will prove useful for our test.
Change the number of the application accordingly and deploy both applications to the Payara Server domain:
./asadmin deploy –name=ForgeRockApp1 –contextroot forgerock-test/app1 ForgeRockTestApp-1.0-SNAPSHOT.war
./asadmin deploy –name=ForgeRockApp2 –contextroot forgerock-test/app2 ForgeRockTestApp-1.0-SNAPSHOT.war
And with this our setup is complete!
Ok, now that the scenario is ready. We can test how the authentication and authorization features work:
1. First, point your browser to the URL of the application 1 (remember to access the application though the URL of OpenIG, which is the root of the Apache Tomcat), the browser will redirect you to the OpenAM login screen:

2. Login as user Alice. You will see that the browser redirects to the original URL of the application and that Alice information is returned within the headers of the request:

3. Now, open a new tab and try to access application 2. Since Alice doesn’t have access to it, the browser will get a 401 – Unathorized:

4. We will proceed to test the setup with user Bob now. Point your browser to the OpenAM URL (while still logged as Alice). The OpenAM will show the user profile page. Click on the Logout option:

5. Head to application 2 again, and login as user Bob. Since Bob has access, the application 2 page will show up with Bob’s information as well:

6. While logged as Bob, try to access application 1. You will get a 401 – Unathorized error since Bob doesn’t have access to this resource.
7. Finally, log out while logged in as Bob, head to application 1 and log in as user Carl. Now, open a new tab and head out to application 2. You will see that Carl accesses application 2 without having to log in again and can access both applications without issues:


Congratulations! Our test scenario works! Feel free to create more resources for your test applications and/or repeat this scenario with more users (and groups even!).
The ForgeRock suite of security solutions is a great toolset for securing web applications in your organization while simplifying the effort needed to secure these resources by delegating this task to OpenAM. Although, at the moment, securing applications deployed in Payara is not possible using the recommended way (policy agent), it is possible to use OpenIG to fill this need. In the future we expect that Payara Server will become compatible with OpenAM and reduce the complexity of the current integration scenario by using a compatible policy agent.
The ForgeRock suite products not only deal with single sign on uses cases, but also exposes functionality to handle Federation, User Managed Access, Password and Capture Replay, and many other features to complement an existing security infrastructure. We encourage you to read their documentation to learn more about these features!
{{cta(‘f33a0656-ef0a-435a-874a-2b1765051217’)}}
Share:

 7 minutes
Modernizing enterprise applications is a strategic imperative for organizations that want to remain competitive and resilient. According to our […]
 5 minutes
At Devoxx Belgium 2025, I was able to talk about what happens after you build your container. In theory, […]
 5 minutes
You’ve probably been in that hallway conversation (or Teams/Zoom meeting) where DevOps, SRE and Platform Engineering all get thrown around. Sometimes these words are […]