Creating a Simple Deployment Group
Payara
Note: This blog post is an update to Creating a Simple Cluster, which was written for Payara Server 4.
Continuing our introductory blog series, this blog will demonstrate how to set up a simple Hazelcast deployment group containing two instances. Deployment groups were introduced with Payara 5 to replace clusters. They provide a looser way of managing servers, allowing instances to cluster by sharing the same configuration whilst providing a single deployment target for all of them. See here to read more about Deployment Groups.
In contrast to a development environment, where a single server is enough to act as a “proof of concept”, in production it is usually necessary to look at reliably hosting your application across multiple redundant hosts to guarantee a reliable service and allow for future scaling. With Payara Server, it is possible to easily create and add instances to deployment groups using Hazelcast, making distributed application configuration a breeze.
To follow along with this blog post, you will need:
Our first step is to create an SSH node. For more details on what an SSH node is, and why we will be using one here, read the overview blog.
Once the requirements have been satisfied, our first step in creating our cluster will be configuring our second Ubuntu host (“computer2“) with its own Payara Server installation and a way to communicate with our original Ubuntu host (“computer“).
As both of our hosts are running a GNU/Linux OS, and we require full control of the second host, we will create an SSH node on the computer2. As part of creating the node, we will also take advantage of a very useful Payara Server feature – its ability to create a zip archive of itself and install it on a remote node (thus guaranteeing that both installations are the same and saving time).
So, the high-level steps to configure computer2 are:
To receive SSH traffic, computer2 must have an SSH server listening. The Ubuntu virtual machine I’m using doesn’t have an SSH server installed by default, so we will install OpenSSH server from the Ubuntu repositories:
sudo apt install openssh-server
For versions of Ubuntu prior to 16.04, this would be “apt-get install”
After installing OpenSSH server, it should automatically start. Running “netstat -lnt | grep 22” should show that port 22 (the default SSH port) is now open and listening for traffic:

Now we have SSH set up on the second Ubuntu host we can safely create the new node. On the nodes window, click the “New” button.
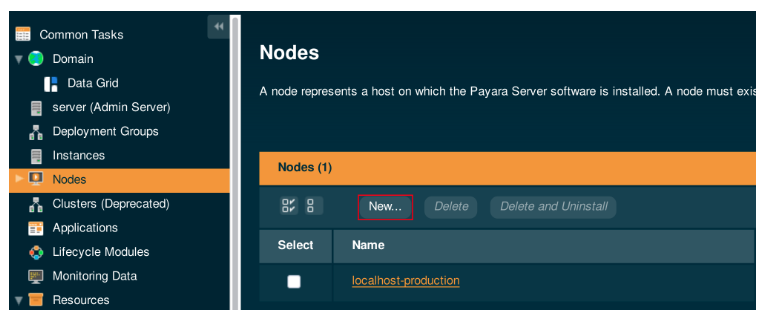
You now need to fill out the new node’s properties:
With the form filled in, press the OK button. Don’t worry if you see a pop-up saying “A long-running process has been detected” – there is a slight pause while it makes a copy of your Payara Server installation and installs it on the second Ubuntu host.
Once the Payara Server installation has been safely transferred, and the node created, you will be returned to the Nodes page.
With our remote node set up, we have our foundation. We now need to configure two instances – one on each node – which will host our deployed application. By making those instances share the same configuration and adding them to a deployment group, we can turn them into something that resembles a cluster from Payara 4. We will first need to create a new configuration which they will both reference so that, like a legacy cluster, we can make a single change which takes effect on both instances.
To create a new configuration for our Hazelcast cluster, click on the “Configurations” parent node in the left-hand tree to go to the Configurations page, then click the “New…” button to create a new config for our deployment group.
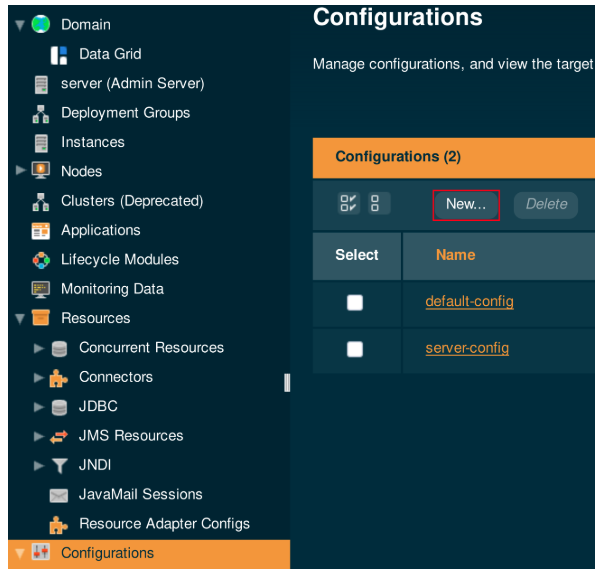
In any new installation of Payara Server, there will be two existing configurations:
Because we don’t want to accidentally include any modifications we have made to the DAS configuration, we will copy the default-config and name it dg-config.
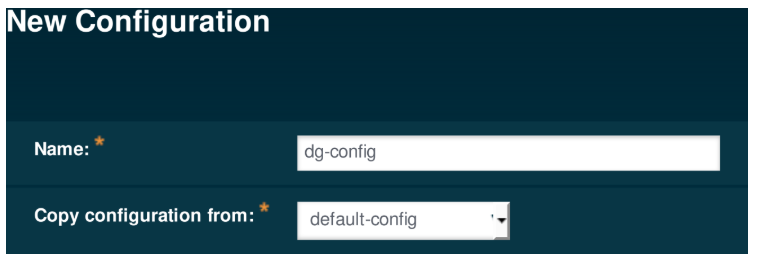
Accept the default settings and save the new configuration.
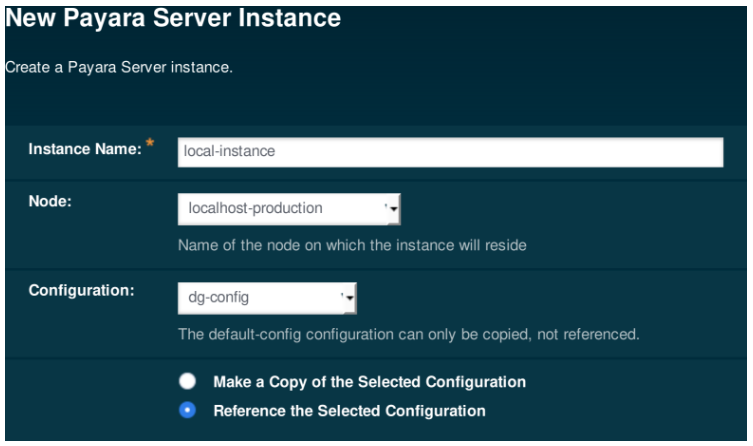
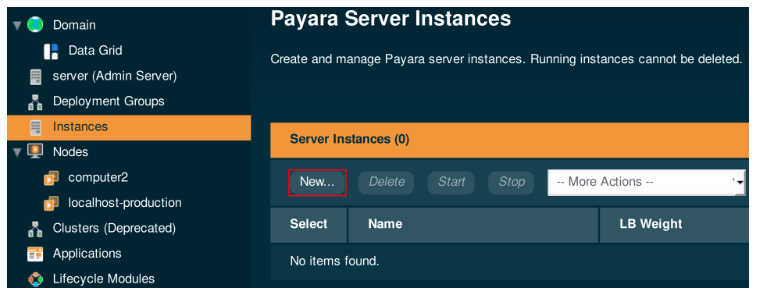
Next, we need to create instances which use our new configuration. To create an instance on localhost, click “New” on the Instances page.
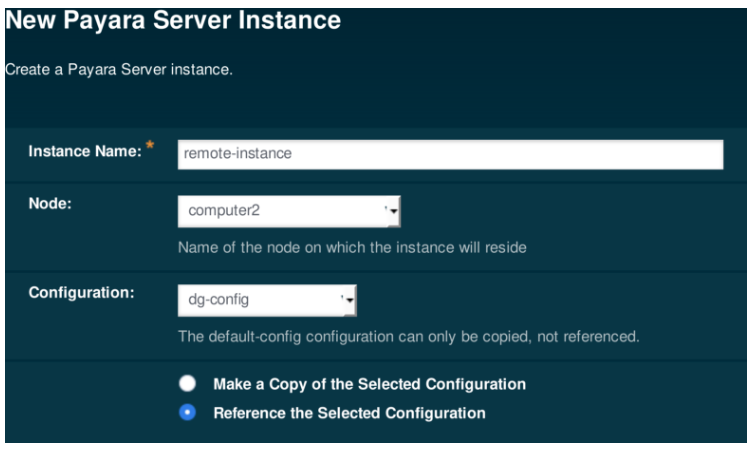
On the New Payara Server Instance page, create the instance as shown below:

Press “OK” to finish creating our first instance.
We can repeat the same process as before to create an instance on the remote node simply by referring to the remote node as shown below:
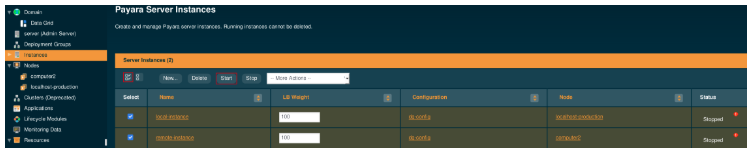
Press “OK” to create our second and final instance and to be returned to the Instances page. You should now have two instances marked as “Stopped”. Select them both using the checkboxes to their left, and start them.
Now, to link together our server instances, we can create a deployment group. This allows an application to be deployed to each at the same time.
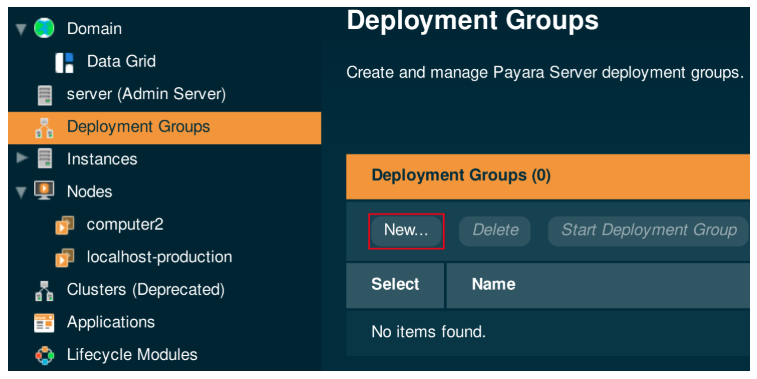
To create a new deployment group, click on the “Deployment Groups” parent node in the left-hand tree to go to the Configurations page, then click the “New…” button to create a new deployment group.
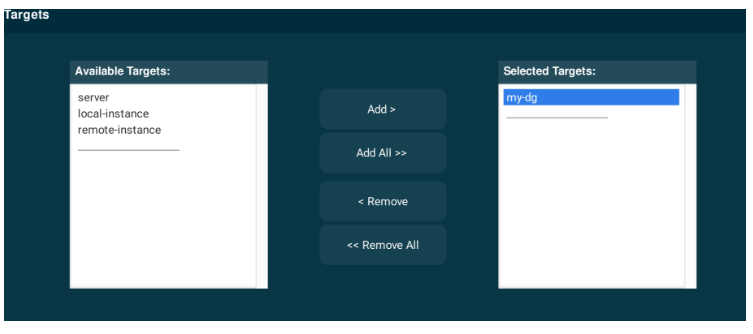
On the creation page, make sure to configure the deployment group name, and add the created instances to the deployment group.
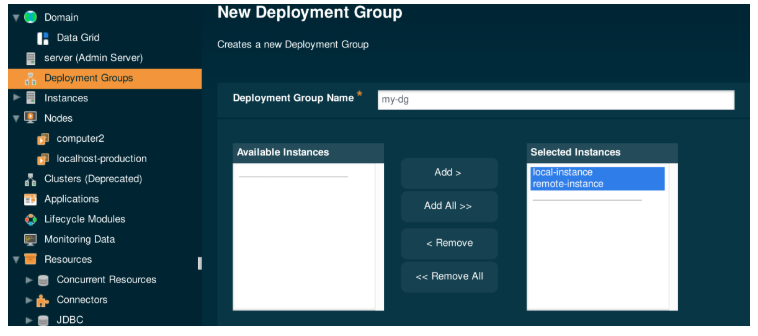
When you click ‘okay’ the deployment group will be created.
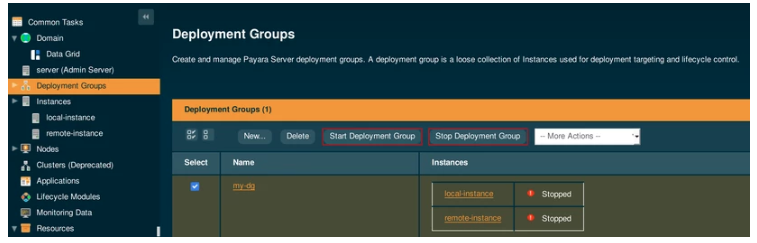
Once the deployment group is created, you can start and stop all instances in the deployment group from the deployment group page:
The Payara Examples repository on GitHub is full of projects which demonstrate specific features available to Payara Server. We will be using the rest-jcache application to demonstrate how Hazelcast seamlessly distributes data – but first, we need to download and build it.
sudo apt install git maven
git clone https://github.com/Payara/Payara-Examples
Once there, you can run the command “mvn clean install” to use Maven to build the project.
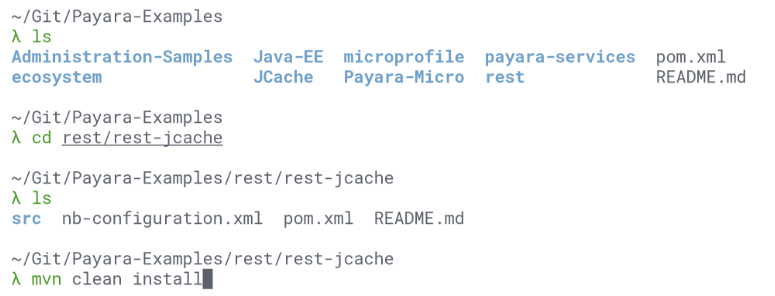
Maven will automatically download the dependencies and build the project: the compiled web application will be stored as a WAR file within the target directory:
Now that we have our test application built, we can deploy it!
To test our cluster’s distributed caching ability, we will deploy the application to all instances in the cluster and then add some data to demonstrate how we can modify the data within the entire cluster at the same time by editing the values in a single instance’s local cache.
First, select the “Applications” page in the page tree and click on “Deploy…”.
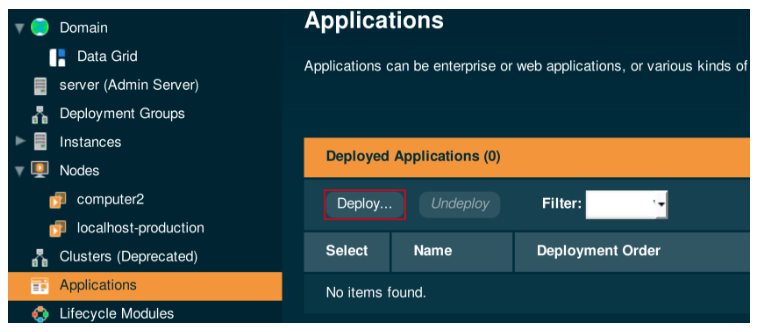
Next, upload your built application using the “Browse…” button, making sure to add neither of our instances to the “Selected Targets”, instead adding the newly created deployment group.
Payara Server will handle distributing the application to the instances contained in the deployment group.
The rest-jcache application uses JCache API annotations on JAX-RS REST methods and listens on the “cache” endpoint. GET, PUT and DELETE requests are all supported:
We will first demonstrate how the second Ubuntu host has a default value of “helloworld” then, by editing the value stored within the first Ubuntu host, show how Hazelcast will automatically make the cache entry available to all members in the cluster.
1. Retrieving the default value of key “payara”
Our data is stored within the application in JSON format as key-value pairs. Retrieving a key which doesn’t exist in the cache gives the default value of “helloworld”, which we will receive from the local instance when making the following request:
curl "http://<Local_IP>:<Local_Instance_Port>/rest-jcache-1.0-SNAPSHOT/webresources/cache?key=payara"

As you can see, there is currently no value stored for “payara” so we get the default value in return from the local instance.
2. Add a new value for key “payara” in the remote instance
We can add a value to the “payara” key with the following command:
curl -H "Content-Type: application/json" -X PUT -d "badassfish" "http://<Remote_IP>:<Remote_Instance_Port>/rest-jcache-1.0-SNAPSHOT/webresources/cache?key=payara"

Thanks to the Hazelcast cache, this updated key-value pair will immediately be distributed across our deployment group.
3. Retrieve the new value from the local instance
we will be able to see this immediately when we re-run our original command:
curl "http://<Local_IP>:<Local_Instance_Port>/rest-jcache-1.0-SNAPSHOT/webresources/cache?key=payara"

And there we have it, a working Payara Server cluster, powered by Hazelcast! Now we have our deployment group in place, we can start deploying our applications and making the most of our new scalability, as well as configuring our deployment group for load balancing and proper session handling which will be covered in coming blogs.
Want to try deployment groups in Payara Server 5?
{{cta(‘6c4914a9-26de-4da5-b0fe-cd9f01ed1bea’)}}
Share:

 4 minutes
The March 2026 release brings important platform modernization, stability improvements, and comprehensive bug fixes across the Azul Payara Platform […]
 1 minute
Earlier this week, we’ve launched the 2026 Payara Platform Community Survey and we’d love to hear from you. If […]
5 minutes
The February 2026 release of the Payara Platform is centered on a major initiative to streamline the platform. This involves removing […]
Hi Mathew:
This is indeed great article to get people started on Payara server. This help me to get started with deployment work on payara server. However I’m having trouble getting remote instance to start from DAS, I can start the remote-instance from the remote machine but the remote instance status does not get updated on the DAS machine and I see no error in the log files on both mschine (das and remote host ).
Any help would be appreciated
Hi Asif,
Thank you very much, I’m glad you found it helpful! Have you made sure the instances are clustered? You should be able to see a data grid message showing the two servers. Secondly, are there any errors when trying to start the remote instance from the DAS? If you’re still having issues I’d recommend raising a topic on our forum: https://groups.google.com/g/payara-forum/ and mentioning the steps that you did, as well as what the problem is.
Best regards,
Matt
Rolling upgrades are supported, is there a downtime when deploying an application? Or just apply for save application session state across upgrades.
Hi Miguel,
We have another blog that talks about rolling upgrades: https://www.payara.fish/blog/payara-server-rolling-upgrades. Have a look and see if that’s helpful! If not, you can always ask the question on our forum: https://groups.google.com/g/payara-forum.
Best regards,
Matt
Doesnt works..
Command succeeded with Warning Successfully created instance threads6-instance in the DAS configuration, but failed to create the instance files on node threads6-node (192.168.145.20).
Command failed on node threads6-node (192.168.145.20): Could not contact the DAS running at localhost:4848. This could be because a firewall is blocking the connection back to the DAS or because the DAS host is known by a different name on the instance host localhost. To change the hostname that the DAS uses to identify itself please update the DAS admin HTTP listener address.
Command _create-instance-filesystem failed.
To complete this operation run the following command locally on host 192.168.145.20 from the Payara Server install location /opt/payara6:
lib/nadmin –host localhost –port 4848 create-local-instance –nodedir /opt/payara6/glassfish/nodes –node threads6-node threads6-instance Command succeeded with Warning
Successfully created instance threads6-instance in the DAS configuration, but failed to create the instance files on node threads6-node (192.168.0.20). Command failed on node threads6-node (192.168.0.20): Could not contact the DAS running at localhost:4848. This could be because a firewall is blocking the connection back to the DAS or because the DAS host is known by a different name on the instance host localhost. To change the hostname that the DAS uses to identify itself please update the DAS admin HTTP listener address. Command _create-instance-filesystem failed. To complete this operation run the following command locally on host 192.168.0.20 from the Payara Server install location /opt/payara6: lib/nadmin –host localhost –port 4848 create-local-instance –nodedir /opt/payara6/glassfish/nodes –node threads6-node threads6-instance
Running locally in remote host:
root@localhost:/opt/payara6/glassfish# lib/nadmin –host localhost –port 4848 create-local-instance –nodedir /opt/payara6/glassfish/nodes –node threads6-node threads6-instance
Remote server does not listen for requests on [localhost:4848]. Is the server up?
Unable to get remote commands.
Closest matching local command(s):
create-local-instance
Command create-local-instance failed.