Configuring Sticky Sessions for Payara Server with Apache Web Server
Payara
*Note: This blog post is an update to Configuring Stick Sessions for Payara Server with Apache Web Server, which was written for Payara Server 4.
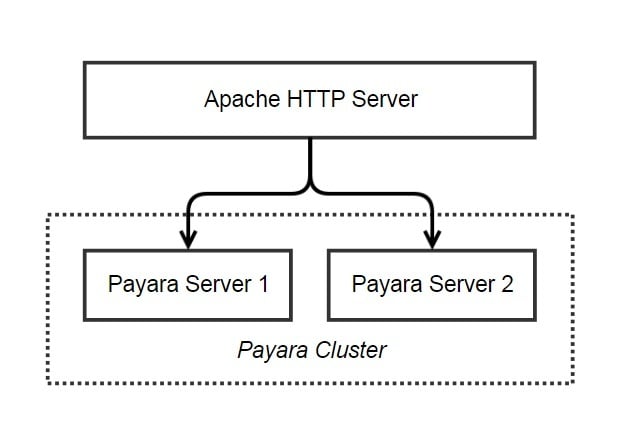
This article continues our introductory blog series on setting up a simple deployment group with Payara Server, carrying straight on from our last blog where we set up a load balancer for our deployment group.
By managing our Payara Servers together under a single deployment group and balancing traffic between them with Apache Web Server we keep the benefits of having our application accessible from a single URL and gain the resilience and expansion prospects from having our application deployed across multiple instances.
However, an application spread over multiple instances can cause issues with your application’s sessions. Previously, when hosted on a single instance, a session was something which was dependable and unlikely to change during the course of a user’s browsing session. Now, however, we have sessions being created on every page load as our load balancer diligently spreads traffic across our instances. What we want is a way to have traffic as a whole balanced as users access our application, but have individual users remain on the same host for the duration of their session, so that their shopping baskets don’t empty themselves every time they refresh the page. The session is stored within a cookie, which is essentially a way of getting around HTTP’s stateless nature. We will need to append this cookie with the JVM route – a way of distinguishing which instance the session is attached to.
Thankfully, there is an Apache Web Server module which does just that. In this blog, we will be looking at how you configure sticky sessions using the JSESSIONID cookie and JVM routes and demonstrate them in action with the clusterjsp application.
If you have been following this series, we are building on the previous blog where we configured load balancing for our cluster.
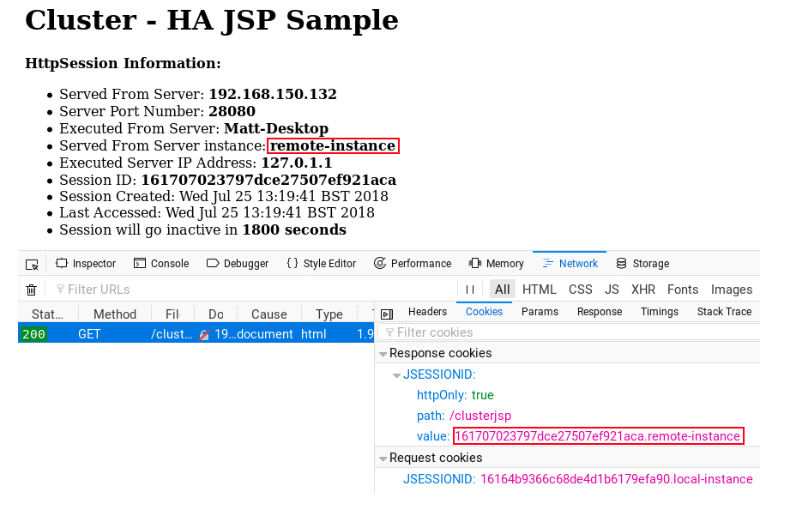
We will continue to use the clusterjsp application to demonstrate our sticky sessions. The clusterjsp application is a simple JSP page which displays some helpful data about how we have been served the web page, as well as giving us a JSESSIONID which will prove useful to demonstrate our sticky sessions. While you can view the cookie printed on the clusterjsp page, the route which we will be adding will only display within the developer console of your browser.
As before, deploy the application from the “Applications” page to both instances, leaving the default values intact for now.
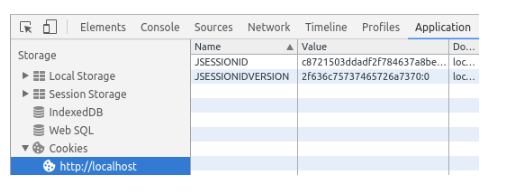
On Chrome you can view your cookies on the Developer Console (F12) under Application > Storage > Cookies:
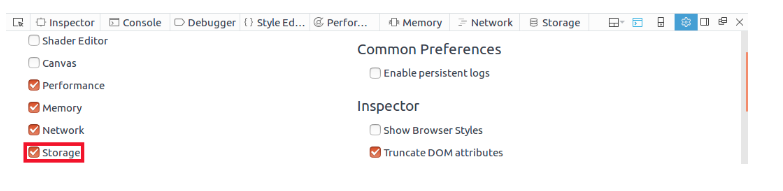
On Firefox you may need to specifically enable the “Storage” tab within the Developer Console (F12) to view cookies:
If you go to the clusterjsp page, you will see that we currently have only two cookies JSESSIONID and the JSESSIONIDVERSION (which we can safely ignore) – no other values are associated with our session, and when we refresh the page we are given a new session, often on a new machine.
We will need to edit two places to get our sticky sessions configured. Firstly, in Apache Web Server, we will need to modify our existing load balancer to take into account our wish to remain on the same server by specifying a route identifier which maps to our Payara Server instances. Secondly, we will need to modify our Payara Server instances to have this route identifier so that traffic from Apache Web Server gets to the right host. The end result will be a JSESSIONID cookie and its initial route, separated by a period (e.g. “cac78b5a876dc8ed02e65bd3fc79.local-instance”).
To configure Apache Web Server with sticky sessions, we will need to modify both our balancer members and our ProxyPass statement. To specify the route (which Payara Server refers to as the jvmRoute) we will need a unique value to refer to each of our instances. Luckily, since the instance name has to be unique, we can use that. Get the name of each of your Payara Server instances (in my case, “local-instance” and “remote-instance”) and add route=<Instance Name> to the end of both your balancermember lines. You will also need to add “stickysession=JSESSIONID” to the ProxyPass line to define which cookie will be used to store the route data.
<Proxy "balancer://payara/">
 BalancerMember "http://<Local-Instance-IP>:<Local-Instance-Port>/" route=<Instance Name>
 BalancerMember "http://<Remote-Instance-IP>:<Remote-Instance-Port>/" route=<Instance Name>
 ProxySet lbmethod=byrequests
</Proxy>
ProxyPass / "balancer://payara/" stickysession=JSESSIONID
ProxyPassReverse / "balancer://payara/"
Your site configuration should now look something like this:
<VirtualHost *:80>
    #ServerName www.example.com
    ServerAdmin webmaster@localhost
    DocumentRoot /var/www/html

    #LogLevel info ssl:warn

    ErrorLog ${APACHE_LOG_DIR}/error.log
    CustomLog ${APACHE_LOG_DIR}/access.log combined

    <Proxy balancer://payara >
        BalancerMember http://192.168.150.132:28080 route=remote-instance
        BalancerMember http://192.168.150.138:28080 route=local-instance
    </Proxy>

    ProxyPass           /    balancer://payara/ stickysession=JSESSIONID
    ProxyPassReverse    /    balancer://payara/
</VirtualHost>
Save your configuration and restart Apache Web Server with “sudo service apache2 restart” to apply your changes.
To configure Payara Server for our sticky sessions, we will only have to add the missing jvmRoute which the Payara Server instances don’t currently provide.
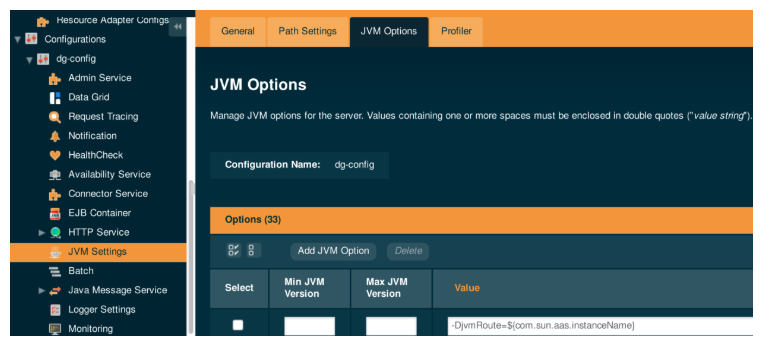
Thankfully, within Payara Server the instance name we used in the site config is an environment variable (“com.sun.aas.instancename”) which we can set in the cluster config and which will be dynamically specific for each instance (rather than having to further specify “-DjvmRoute=local-instance” and so on, for every instance).
To go to the JVM Settings page, select the deployment group configuration from the page tree and then select “JVM Settings” from the list. To add the new jvmRoute variable, go to the “JVM Options” tab and click “Add JVM Option”. In the box that appears, enter “-DjvmRoute=${com.sun.aas.instanceName}”. This will add a new JVM variable (“-D”) that sets the jvmRoute to be whatever the instance name is for any instance which references this config:
With the jvmRoute added to the JVM options, we should now have sticky sessions ready to go.
Going back to our clusterjsp application, when we refresh the page Apache Web Server will now continue to send us on the same route. You can see the full cookie by again opening the Storage tab on the Developer console; as you can see our JSESSIONID has been appended with “.local-instance”. If you delete the cookies and refresh the page (as if you were logging out, for instance), you will receive a new cookie and again be bound to one of the two hosts.
And with that, we have configured sticky sessions in Payara Server, thanks to some help from Apache Web Server. Our cluster of Payara Server instances has grown significantly from the start as we have added features and improved its capabilities. From here you have a solid base to expand your applications options – we’ve implemented a scalable system, that, while still able to be improved, is a great start to a reliable, high-availability production environment.
Try it out – Download Payara Server
{{cta(‘6c4914a9-26de-4da5-b0fe-cd9f01ed1bea’)}}
Share:

 4 minutes
The March 2026 release brings important platform modernization, stability improvements, and comprehensive bug fixes across the Azul Payara Platform […]
 1 minute
Earlier this week, we’ve launched the 2026 Payara Platform Community Survey and we’d love to hear from you. If […]
5 minutes
The February 2026 release of the Payara Platform is centered on a major initiative to streamline the platform. This involves removing […]
hi, i have a single payara instance. have been able to configure request forwarding from my apache web server to my payara. however upon every reload of a page using the actual domain url i have, the session gets recreated hence losing any attributes stored in the session from the previous request. However, same does not occur when i access my application via the ipaddress instead of the domain name
i am using a centos8 vps. didnt find mod_sessions as part of the modules in the /etc/httpd/modules folders so i installed using
yum install mod_sessions
and after running successfully checked and they were now in the modules folder. so i then edited the /etc/httpd/conf.modules.d/01-session.conf with the following lines
LoadModule session_module modules/mod_session.so
LoadModule request_module modules/mod_request.so
LoadModule session_cookie_module modules/mod_session_cookie.so
LoadModule session_dbd_module modules/mod_session_dbd.so
LoadModule auth_form_module modules/mod_auth_form.so
LoadModule session_crypto_module modules/mod_session_crypto.so
and then restarted the apache httpd server.
However, still doesn’t work. visiting the webpage via the domain name recreates a new session at every request.
i added sticksession=JSESSIONID to the PROXYPASS in the VirtualHost Setting of the domain and still no change. session get recreated at each request
Please help
Hi Peter,
Check that the ServerName property is configured correctly. If the configuration still fails, this may be an issue with Apache HTTPD. If you believe the issue is with Payara, please raise an issue on our forum or Github!
Best regards,
Matthew